Frequently Asked Questions
- What is The Electric Brewery?
- Who uses The Electric Brewery system?
- What were your main criteria in designing The Electric Brewery?
- How much will it cost me to build a brewery like this?
- Where can I buy your Electric Brewery products?
- How much beer can you make with your setup? What size kettles should I buy? What brand?
- Why did you choose a three kettle setup instead of an all-in-one / brew in a bag (BIAB)?
- Why do all three kettles need to be the same size? Couldn't I use a smaller Mash / Lauter Tun or Hot Liquor Tank?
- Do larger batches require more power? What do I need for 30+ gallons or more?
- The voltage in my country is 220-240V. There is no 120V. Can I still use this setup?
- Are there any scorching or caramelization issues with using this setup?
- Does your brewery use any special or proprietary parts?
- Why didn't you add more automation?
- Why did you use hoses instead of hard plumbing lines?
- What sort of efficiency do you achieve with your setup?
- Your efficiency is really high! Do you have any tannin extraction problems?
- Did you get any of your stuff for free?
- What are the benefits of brewing with electricity vs. gas?
- What are the electrical costs to brew with electricity?
- How long does it take to heat with electricity?
- Where is your brewery located?
- What kind of beers do you brew? What have you brewed?
- Can you make Miller / Coors / Bud light with your brewery?
- How do you serve your beer?
- How long did it take you to build this brewery? How long will it take me?
- I don't have time to build this / I want to buy a setup like this. Will you sell me a setup like yours?
- What's your brew day like?
- How can I know when new information is added to the site?
- Do you have a full schematic of your control panel available?
- Why didn't you use <some part name> instead? Wouldn't it cost less?
- How long does it take to brew beer with your setup?
- Have you written any guides similar to this one?
What is The Electric Brewery?
Founded in 2009, The Electric Brewery is the original no compromise all-electric brewing setup used in over 60 countries by homebrewers and professional breweries to repeatedly and consistently create the highest quality of beer possible in any style imaginable. It uses non-proprietary (off-the-shelf) industrial grade components to ensure long term serviceability. Build once, use it a lifetime.
This website provides you with complete step by step instructions to build and use this Electric Brewery, along with dozens of recipes. Don't want to build or source parts yourself? Our shop features parts, kits, and pre-assembled products that are carefully hand built and tested in the USA. They are not made off shore or mass produced. We ship worldwide and support our products and customers for life.
Who uses The Electric Brewery system?

The Electric Brewery is used in over 60 countries by homebrewers, commercial breweries, brew on premise shops, brew pubs, restaurants, industrial and entertainment corporations, distilleries, Kombucha brewers, and more! Hundreds are also using our design to serve other purposes including fruit juice pasteurization, mushroom growing, sous-vide cooking, and the creation of artisan pickles.
Locations include Afghanistan, Argentina, Australia, Austria, Barbados, Belgium, Belize, Brazil, Canada, Chile, China, Costa Rica, Croatia, Czech Republic, Denmark, Ecuador, Estonia, Finland, France, Germany, Ghana, Greece, Greenland, Guatemala, Hungary, Honduras, Hong Kong, Iceland, India, Indonesia, Ireland, Israel, Italy, Japan, Kazakhstan, Latvia, Mexico, Netherlands, New Zealand, Norway, Paraguay, Peru, Philippines, Poland, Portugal, Puerto Rico, Romania, Russia, Scotland, Serbia, Slovakia, Slovenia, South Africa, South Korea, Spain, Sweden, Switzerland, Thailand, Turkey, Ukraine, United Kingdom, and the United States (including Hawaii and Alaska).
By far the most remote location was the USS Carl Vinson Nimitz class supercarrier where one of our customers built his control panel while stationed.
Visit our Testimonials page for some examples.
What were your main criteria in designing The Electric Brewery?
Our all-grain brewery had to meet the following criteria:
- 100% electric for indoor brewing
- Safe, easy, and enjoyable to use
- Not limit the brewer in any way
- Provide extremely repeatable and consistent results
- Use industrial quality parts that last (stainless steel, limit the use of plastics)
- Use standard off-the-shelf parts to ensure long term serviceability (limit the use of special / proprietary parts)
Note that price is not included on this list. When we weighed price vs. performance vs. safety vs. convenience, price was considered as the least important factor. That is the complete opposite of what most home brewers consider when they put together a brewing setup. For most, price is always the overriding priority and sacrifices have to be made. That's completely acceptable of course as everyone has different needs, but this is not how our brewery setup was designed.
While cost savings were not the primary criteria in designing our Electric Brewery, we didn't (in our opinion) spend money for no reason. Every expenditure was a conscious decision of price vs. quality / performance / convenience. There's an old saying "Only the rich can afford to buy cheap things" (because you end up buying them over and over again). In designing our brewery we did not want to continually replace components because we were not happy with the performance or because the parts were cheap and broke. Buy once, use it a lifetime.
It's been many years since we designed and built the Electric Brewery. We're happy to report that there's absolutely nothing we'd change if we had to do this all over again. Having brewed with it hundreds of times, there's nothing we look at and think "We should have done that differently". We waited more than a year before publishing our build information as we wanted to make sure we were 100% happy with the setup, thus ensuring that others would be as well.
Our setup may not be for everyone, but those that do follow our instructions to build their own Electric Brewery, we think, will be suitably impressed with the outcome. More on our testimonials page.
 Janet's Brown Ale: A speciality IPA that has been a homebrewer favourite ever since it took gold at the 2004 National Homebrew Competition
How much will it cost me to build a brewery like this?
The number one question we get asked is "how much?". Below is a 2019 price breakdown based on the average range that most brewers are spending on the various components that make up their Electric Brewery setups:
- Hot Liquor Tank: $300 - 750
- Mash / Lauter Tun: $180 - 595
- Boil Kettle: $210 - 625
- Hoses: $120 - 175
- Pumps: $200 - 385
- Wort Chiller: $40 - 240
- Temperature Probes: $132
- Control Panel: $1495
Total: $ 2677 - 4397 USD
Keep in mind that pricing will depend on the features and options you end up choosing such as brands and kettle sizes. For example: Choose 10 gallon generic brand kettles and skip a few features and expect to pay closer to the lower end of the range. Choose larger 20 gallon Blichmann boilermaker kettles and include more of the features we recommend and expect to pay closer to the higher end of the range. A brewer who already has some of the parts or components would of course be able to reduce the cost considerably. Remember, this is a one-time sunk cost for a setup that will last you a lifetime.
Some are quick to point out that a lot of beer may be purchased for that amount of money. That is very true but that is not what this is about. Brewing for us is a hobby and a passion, not a means to save money. We enjoy the art and craft of making beer and being able to call it our own. We received an email recently from a fellow brewer that we think sums it up nicely. He wrote: "Your build is a prime example of the direction home brewing is going and definitely invites people to take a more serious interest in our hobby and craft."
The cost of consumables to make beer on our Electric Brewery is very low. All things added up (electricity, grain, hops, and yeast), a standard 12 oz glass of beer costs only pennies to produce. We purchase our grain in bulk 50-55 pound sacks to keep the costs low.
Everyone will use different criteria when designing a home brewery. What's right for one person may not be right for another. If upfront cost savings is your overriding priority then you're in luck as there are hundreds, if not thousands, of websites that will show you how to make beer for the lowest upfront cost possible. Our setup is for the brewer who may have already "been there" and "done that" and now wants to upgrade to something more professional that will produce the highest quality beer possible and last a lifetime.
We've never run into any issues or problems with our Electric Brewery setup. We've never had a stuck sparge, missed a target gravity, had over / under temperature issues or had clogged valves or pump priming issues. Our setup just works. This allows us to focus our attention on recipe creation instead of worrying if the equipment will work correctly. Because of this, we really look forward to the days when we brew. Isn't a hobby supposed to be enjoyable, after all?
Where can I buy your Electric Brewery products?
Our Electric Brewery products are only available through our online shop. We do not build products for other sellers, nor do we assist in the design, development, or support of products for other sellers. Keep in mind that we give away information for free so many have started building and selling products regardless of their past experience in brewing or electrical work. Many companies have come and gone since we first published our electric brewery build instructions in 2009. We support our products and customers for life.
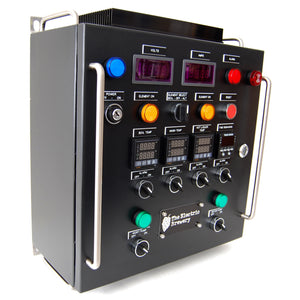
 Our Electric Brewery Control Panel kits include only quality parts made to last. Every last part you need to build your own is included.
How much beer can you make with your setup? What size kettles should I buy? What brand?
The Electric Brewery setup is scalable and is used to produce up to approximately 100 gallons of beer (per batch) depending on the kettle size and control panel used. Most home brewers produce between 5-15 gallons using smaller kettles and our Standard 30A Electric Brewery Control Panel while professional brewers typically produce between 1-3 barrels (31-93 gallons) using larger vessels and our 50A Electric Brewery Control Panel for 30+ gallons.
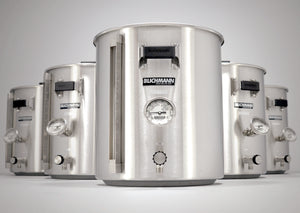
The Blichmann Boilermaker kettles we use are all 20 US gallons in size which allows us to brew between 5-10 gallons of beer per batch, regardless of style. If pushed, we can get to 13-14 gallons but most times we typically try and aim for 10 gallons of finished beer per batch. This is enough to fill two 5 gallon kegs. Whether it's a 3% ABV (alcohol by volume) light beer or a 12% Barleywine, having 20 gallon kettles allows us the flexibility to brew up about 10 gallons of just about anything we can dream up.
If you only intend on brewing 5 gallon batches consider smaller 10 gallon kettles. If you're thinking that 15 gallons is more your style consider larger 30 gallon kettles. Want to brew 20 gallons or a full barrel (31 gallons) at a time? The massive 55 gallon kettles are what you'll need. The optional Blichmann 55 Gallon BoilerMaker Extensions may be added to the 55 gallon kettles to increase capacity to 100 gallons for a 2 barrel nanobrewery.
Not sure what size is right for you? Keep this in mind: The amount of time it takes to brew is (generally speaking) the same regardless of batch size. Most brewers look for a good balance between how much work is involved, the amount of beer produced, and how long it's going to take to consume. This means that most home brewers stick to producing approximately 10 gallons of finished product per batch. It's the perfect balance between not having to drink the same beer for months on end and getting the most out of the work involved. Even 10 gallons of beer may seem like a lot at first, but once your friends and family find out what you're up to you'll be surprised how fast it disappears! Most brewers who start with smaller kettles end up wanting to upgrade.
For the ultimate in flexibility, we recommend that all three kettles be at least twice the size of the amount of beer you wish to produce. This is to account for the various losses that occur such as evaporation / expansion / foaming during boiling, grain / hop absorption, chilling / fermentation sediment, racking / kettle / hose deadspace, etc. We always perform full wort boils in order to produce the best quality beer possible. We do not dilute with water.
Kettles from various manufacturers are available, and our design will work with any kettles in existence. Feel free to choose whatever meets your budget. We chose Blichmann Boilermaker kettles for the very efficient false bottom (achieves high mash efficiency), quick remove dip tubes (no tools required), and well protected / easy to read sight glass visible on the outside of the kettle (no hard to read etched markings on the inside). These kettles are incredibly quick and easy to clean too which reduces work on brew day. Even after more than 10 years of use we would still purchase these kettles again if we had to rebuild. See our Kettles (overview) guide for more information.
Why did you choose a three kettle setup instead of an all-in-one / brew in a bag (BIAB)?
When designing a no compromise brewery we recommend an open source 3-kettle design as per our build instructions as it helps maximize product quality, durability, flexibility, serviceability, and compatibility with add-on devices. Most all-in-one setups are greatly simplified non-serviceable proprietary designs made using the cheapest parts possible, purposely made to only work with products from the same manufacturer. We recommend using quality parts made to last, and limiting the use of proprietary parts to ensure long term serviceability (more information). Considering going pro in the future on a much larger scale system? Our design closely mimics the 3+ vessel brewhouse you will use in the future in both process and equipment, allowing for simplified recipe scaling. Many pros use our design as their pilot setup for recipe formulation / testing.
Advantages of our three kettle design when compared to all-in-one / brew in a bag (BIAB) setups:
- Larger batch sizes possible. Our design is used to produce up to approximately 100 gallons of beer. Most all-in-one setups are limited to 5 gallons.
- Higher mash efficiency. Our design has a mash efficiency as high as 95-97% while most all-in-one setups achieve 65-75%. This means our setup requires half as much grain to produce the same beer, reducing the cost per batch.
- Easier to brew higher alcohol (ABV) beers. With our design you may brew any ABV beer you like. Most all-in-one setups are very limited to how much grain can be used (the lower efficiency mentioned above doesn't help) so the maximum ABV is limited. On most all-in-one setups brewing beyond standard strength beers means you either have to produce less beer, or use reiterated mashing (using the wort from a first mash to mash a second time). Not only is reiterated mashing very slow, it's also very inefficient, which in turn once again increases the amount of grain required. We wanted our setup to be able to brew any beer, in full volume, in any strength, in an efficient manner, the same way every time. We did not want our setup to impose any limitations on the brewer, or have to compensate / make adjustments due to equipment limitations from one beer to the next.
- No limits on what ingredients may be used. Many all-in-one setups will clog or not work properly when certain types of ingredients are used. Always having to use hops in pellet vs whole form, or having to keep the amount of unhusked grains below a certain percentage, are common complains we've heard from brewers on all-in-one setups. Our design does not have these limitations. We can brew with pellet hops, whole hops, or even mash with 60-70% unhusked wheat without the use of additional rice hulls. We did not want our setup to limit the brewer in any way.
- Impossible to scorch the wort during mashing. On our design the wort is completely separated from the heat source during mashing, making it impossible to scorch the wort, even if flow is stopped due to operator error or part failure. On an all-in-one setup the batch may scorch due to the co-location of mash and heat source. If that happens the batch must be dumped.
- Mashes at any temperature are possible. This includes step mashes at lower temperatures (such as a 95-113F acid rest used in a Weizen). Lower temperature mashes are very gelatinous / sticky and can be difficult to implement on an all-in-one setup without scorching due to the direct contact nature of the grain with the heat source. Many all-in-one users will avoid using lower temperature mashes for this reason as any reduced flow can scorch the wort requiring the batch to be dumped. Mash scorching is impossible on our design. Again, we did not want our setup to impose any limitations on the brewer, or limit how or what we brew due to equipment limitations.
- Ability to brew back to back batches. Our 50A Electric Brewery Control Panel for back to back batches allows you to boil one batch while heating water for the next.
- Higher flexibility. In our design the kettles can and are optimized for the specific steps they perform as they are separated. With simplified all-in-one setups the steps (heating, mashing, sparging, boiling) are combined, and sacrifices have to be made. For example, the equipment that works best for mash filtration cannot be used for post-boil filtration (and vice versa). In our mash / lauter tun we use a Blichmann false bottom optimized to assist with grain filtration, and in our boil kettle we use a filter optimized for hop and hot / cold break filtration. One cannot be used for the other so most all-in-one setups do not offer a boil kettle filter.
- Higher power / faster heating / vigorous boil. Our design allows for higher power (again due to the higher flexibility) which results in faster heating than most all-in-one designs. To keep costs low, most all-on-one electric setups are designed to be powered with a standard electrical outlet which has greatly reduced power output. This increases heating times and reduces the vigorousness of the boil. For best stability, clarity, and flavour for some beers we prefer a vigorous boil to drive off volatile compounds and coagulate unwanted proteins. A rapid simmer will not do. Our higher power setup provides fast mash ramp times and the flexibility to choose how vigorously to boil.
- Easier to implement low dissolved oxygen (LODO) brewing. Our design allows for easier LODO brewer (again due to the higher flexibility and separation of tasks).
- Clearer wort going into the boil. Our design has perfectly clear wort entering the boil kettle. On an all-in-one setup the grain must be lifted out before the boil, which disturbs the grain bed and results in grain / husk dust in your boil, which in turn can increase astringency in the final product.
- Can be less messy. Our design does not require you to lift a large and heavy bag or container that is full of hot, sticky, dripping grain.
- Open source using off-the-shelf parts to ensure long term serviceability. Most all-in-one setups are greatly simplified non-serviceable proprietary designs made using the cheapest parts possible, purposely made to only work with products from the same manufacturer. Replacement parts are often not available, especially many years out. When something breaks the entire all-in-ones setup usually has to be replaced. With our design, if something needs to be replaced in a year or in 20 years you'll still be able to do so quickly and easily because the parts are standard.

Why do all three kettles need to be the same size? Couldn't I use a smaller Mash/Lauter Tun or Hot Liquor Tank?
While technically different sized kettles may be used, we recommend that all three kettles be kept the same size.
Smaller kettles will limit the volume of stronger beers you are able to produce as the Mash / Lauter Tun may not be able to hold the amount of grain required, or the Hot Liquor Tank may not be able to hold enough strike / sparge water. Keeping all three kettles the same size provides the ultimate in flexibility.
 Electric Hop Candy: A hazy New England IPA with a surprisingly soft and pillowy mouthfeel, full of juicy, fruit-forward hop flavours and aromas
Do larger batches require more power? What do I need for 30+ gallons or more?
Our standard 30 amp control panel is perfect for producing up to 20 gallons per batch. A single heating element (up to 5500 watts in size) is used in the boil kettle and hot liquor tank.
For larger batches we recommend our 50 amp control panel for 30+ gallons that doubles the number of heating elements to provide 11000 watts of power in each kettle, enough to effectively produce up to 2-3 bbl (62-93 gallons) and possibly more depending on kettle configuration / insulation, ambient temperature, use of a kettle chimney, etc. Perfect for 1-3 bbl pilot systems. This larger control panel can also be used with smaller batches to speed up your brew day too. Brewing small today but thinking of producing more in the future? This is the perfect control panel as you may use single heating element per kettle today, and then double the power in the future by adding additional heating elements.
For some examples of larger setups, take a look at our testimonials page where we show this higher power panel on various sized setups up to and including 3.5 bbl (108 gallons).
Need more power or something custom? Our panels can be interlocked with optional modular booster panels to increase capacity as you grow. Contact us for details.
The voltage in my country is 220-240V. There is no 120V. Can I still use this setup?
Yes. This setup can be used anywhere in the world includes locations such as Europe, Asia, New Zealand, and Australia that run at 220-240V. Modifications to the control panel design and different pumps are required however. See our alternate control panel builds for more information.
Electric Brewery Control Panel kits and pumps for 220-240V only countries are available for order through our shop.
Are there any scorching or caramelization issues with using this setup?
No. We have never experienced any issues with scorching or caramelization of wort even with the most delicate lagers or wheat beers (3-4% ABV, 3-4 SRM). Some pro brewers using our setup have told us that they are experiencing less caramelization having switched from gas to electric heating.
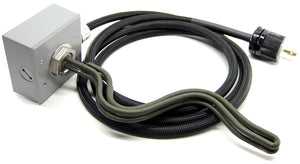
The heating elements we use specifically made for brewing and are ultra-low watt density (ULWD) which means that the heat produced per square inch along the element is very low (50W per square inch). These elements are typically folded over on themselves in a zig-zag pattern making the effective length twice as long as a regular element.
There are no special or unique modifications we do to these heating elements to eliminate scorching or caramelization. These heating elements are used successfully by thousands of electric brewers worldwide. If any issues or limitations existed, we would not be using them.
Does your brewery use any special or proprietary parts?

No. We purposely use standard off-the-shelf parts to ensure long term serviceability.
We want our setup to last us for the rest of our life. We're more interested in the art / craft of brewing than tinkering with equipment. The intent was to spend a year or so designing something that could brew anything and then use it forever. One of our requirements was to make sure that if in one or two years (or even 10-20 years) we needed to replace a part that it be easy to do and possible. We did not want to depend on one specific company to do the work or that they still be in business. The parts used in our brewery (heating elements, valves, relays, PIDs, switches, etc.) are all extremely common parts. They've existed for dozens of years and they will continue to exist for dozens more because of the tens of thousands of (non-brewery related) industrial installations around the world running today that rely on them. We're not married to one particular part or manufacturer.
Say, for example, a PID in our control panel dies in 20 years. We can buy any similar PID from any manufacturer and drop it in as the functionality will be the same. There are hundreds of choices. It does not necessarily have to the same manufacturer at all. The hole sizes are all standard understood manufacturing sizes (1/16 DIN for PIDs, 23mm for switches / lights, etc.) because the industry that uses these parts demands quick and easy serviceability. Pull the old one out, put the new one in.
This long term serviceability was an issue with many of the commercial brewing setups we considered and is one of the main reasons why we decided to design our own. Some commercially available systems use patent pending parts and programming to control the entire brewing process that by law nobody else is allowed to reproduce. What happens if in 2 years (let alone 20 years) down the road the setup fails and the manufacturer is no longer in business? The expensive system is now useless. We've seen many companies with custom brewing setups go out of business after only a year or two, leaving their customers with unsupported equipment worth thousands of dollars. Interest in homebrewing and craft beer is at an all-time high so everyone is out to make a buck. There are dozens of upstart companies popping up every year. Most do not survive.
Other companies use proprietary parts that may or may not be available in the future. For example, we would not want something like the Blichmann Boil Coil as our heating elements as they require two non-standard sized holes in the kettles. If a few years down the road we need to replace one and it's no longer available (or the size has changed) we need to replace the kettles as well or at least find a way to plug those holes. Standard sized heating elements on the other hand will always be available due to the thousands of non-brewery related applications such as hot water tanks.
This website provides anyone building our brewing setup a complete list of standard parts, assembly instructions, and even wiring diagrams. Readers may download our book and effectively have an offline comprehensive service and maintenance manual for life. No other brewing setup comes with this level of detail.
For more information as to why we feel non-proprietary is important, see our Control Panel with Discrete PIDs vs. Computer / Automation? guide.
Why didn't you add more automation?
At the end of the day, we do not see any added benefit.
Semi or complete automation is actually something we never wanted for our Electric Brewery. Some people have asked if it's because we didn't know how to do it or because we didn't want to spend the extra money, but neither is the case. We wanted to keep things 'simple' with what can best be described as manual dials and controls. We still want to feel like we're doing something on brew day. It's a hobby and we want to be part of it. Having a computer adjust some or all of the controls for us just wouldn't be the same.
We do use automation however: The PIDs we use are automated in that the brewer sets the temperature and it is automatically maintained. That sort of automation makes sense to us. We let some components maintain certain control aspects of the system where it would be difficult or cumbersome for a human to do it, but for actually controlling the process steps, we want to be pressing the buttons and turning the valves ourselves.
We also feel that the time required to program the automated steps at the start of the brew day could or would likely take just as long as 'manually' changing certain settings when needed. For example, with today's highly modified malts, most times home brewers (including ourselves) are mostly brewing with single infusion mashes (a single mash temperature is used) so no special process steps are needed. On our setup, we simply set the mash temp and then an hour or two later when the mash is done we press the "up" button a few times to go to mashout temperature. An automated system could automatically do this after the one or two hour period but what exactly is that saving?
Every other operation in a brewery requires disconnecting / re-connecting hoses so we have to go into our brewery for a few minutes regardless. Even this could be automated with valves and controllers but in our opinion that would be a lot of design / implementation / testing (plus added costs) to save only 5-10 minutes of work on brew day. It just doesn't make any sense to us and would result in a much more complex setup, which means it's just more things that may cause problems or break.
Feel free however to experiment and build your brewery any way you like using as little or as much automation as you feel is necessary. After all, it's your brewery!
For more information see our Control Panel with Discrete PIDs vs. Computer / Automation? guide.
Why did you use hoses instead of hard plumbing lines?
An ergonomic assessment of our brew day step by step proved that uses flexible hoses resulted in the least amount of work (function over form).
Hard plumbing would have resulted in higher cost, a more difficult installation, a harder to use system (more valves required, flow cannot be seen), greater heat loss between kettles, and more work to clean (lines need to be blown out, bleeder valves may be required). While it may look cool, hard plumbing does not present any benefits to the brew day on a homebrew sized setup.
We recommend using high temperature silicone food-grade tubing as outlined in the hose build instructions. This tubing is widely used in pharmaceutical, medical, food, and dairy industries. That said, feel free to build your brewery any way you like but make sure to consider the impacts on your brew day.
 Swagelok built a showpiece Electric Brewery brewing setup to display some of their hard plumbed products at trade shows
What sort of efficiency do you achieve with your setup?
For standard gravity beers (3-8% ABV) we achieve a consistent mash efficiency of 95%* according to the software we use (BeerTools Pro). By comparison, most large scale commercial breweries achieve 92-98%. Most home brewers achieve 65-75%.
Efficiency is how well your brewing system is able to take the starches in the grains (and other adjuncts) and convert them into sugars. The higher the number, the more efficient the setup. The more efficient the setup, the less grain needed. The less grain needed, the less money that is spent in making beer.
For what it's worth, efficiency (in our opinion) is given far too much weight by home brewers. We consider consistent efficiency much more important than high efficiency. At the home brew level, a 5-10% efficiency increase is usually only going to mean a few dollars in savings on a typical batch of beer. Given the option, we'd rather have consistent, but low, efficiency all the time, than having higher efficiencies that vary from batch to batch. When we formulate a recipe for a 7% ABV India Pale Ale, we want it to be 7%. Not 6%, not 8%.
With careful attention to design, detail, and our brewing process, we've been able to achieve not only high efficiency but also consistent efficiency. The best of both worlds. This means that a sack of grain in our setup will make considerably more beer than on many typical home brew setups.
*It's important to note that the efficiency reported by different software packages can vary as much as 10% depending on how well their assumed grain maximum yield values match the actual values of the grain you are using. Every grain type is different, and grain can vary from year to year or even sack to sack. Not all software allows these maximum yield values to be modified and not all grain has this information readily available to the brewer. Estimates or averages are sometimes used that may result in different efficiency values based solely on the software package that is used, making efficiency comparisons difficult. We suggest you stick to one software package and find the efficiency value that works for you.
Your efficiency is really high! Do you have any tannin extraction problems?
Some brewers believe that high efficiency will always result in excess tannin extraction. This is not true. We have not experienced problems with excess tannin extraction using our setup. While all beer will have some, with most beers we want to try and minimize tannins. Tannins have a tongue-drying astringent taste like over-steeped tea or strong red wine.
Tannin extraction is most noticeable with lighter tasting beers, the kinds that large commercial breweries produce (Miller / Coors / Bud Light / etc.). These macro breweries are constantly pushing to maximize their efficiency (often reaching as high as 98%) in order to maximize profits. Their beers do not show any issues of excess tannin extraction as they (like ourselves) pay careful attention to their brewing process.
We follow these steps in order to minimize tannin extraction:
- The grain is milled properly to minimize shredding of the husks
- Acid is used to keep the sparge water pH low (5.6-5.8 pH when measured at mash temperature)
- The gravity is not allowed to drop below 1.008 while sparging
- Mashout is done to only 168F (and not above)
We also allow the mash temperature to drop naturally as sparging progresses. By the end of the sparge the mash will have dropped approximately 20 degrees. This is intentional. A lower temperature near the end of the sparge helps minimize tannin extraction from the grain husks when it is most likely to occur (when the mash has less sugar and higher pH). By the end of sparging the mash has very little sugar left so the drop in temperature does not affect the flow.
For more information on our brewing process see our Brew Day Step by Step guide.
Did you get any of your stuff for free?
No. All of the equipment we purchased while writing the instructions for this website were purchased at retail cost from the various vendors we list in our Parts List for Building. We did not ask to be given parts for free nor did any of these vendors know that we would end up writing about them. In fact, in many cases we tried multiple parts before we settled on the ones that worked best and listed them on this site. We probably have enough spare or reject parts left over to build another small-scale brewing setup!
 Some of our leftover parts after designing / building our brewery
What are the benefits of brewing with electricity vs. gas?
Benefits of brewing with electricity:
- Easier precise control of temperature.
- Safe for indoor brewing: No poisonous gases, no emissions. Brewing indoors with gas requires almost 10 times more ventilation as compared to electric, making installation very costly. (read more)
- Electric heating elements are absolutely silent. The bigger gas burners required for brewing sound like jet engines.
- Much more efficient use of energy: Our 5500W heating elements producing ~20,000 BTUs of heat outperform an 80,000 BTU propane burner. This is because with gas 50-80% of the heat bounces off the bottom of the kettle and is lost, while with electric 100% is transferred directly to the water or wort.
- No tanks to refill.
- Cheaper to run: In most locations the cost to brew with natural gas is 2-3 times higher than electricity, while propane is 5-10 times higher.
We don't know of one brewer who, after switching to electric, wished they were still using gas.
What are the electrical costs to brew with electricity?
It costs us about $1.60 in electricity to brew 10 gallons of beer, assuming average electrical rates ($0.12/kWh). If we brew on the weekends or evenings when the rate is lower, the cost is reduced. $0.12/kWh also happens to be the average US national rate so most US brewers can expect similar costs if brewing 10 gallons. These costs do not include taxes, delivery charges, or other fees that your electricity provider may add.
Most of the cost comes from powering the heating elements. We use one 5500W element in both the Hot Liquor Tank and Boil Kettle to brew 10 gallons of beer. The heating elements are used as follows:
- Heat strike water: 45 minutes at 100% power usage = (45 / 60) * 1 * (5500 / 1000) * $0.12 = $0.50
- Mash: 90 minute mash at 5% power usage = (90 / 60) * 0.05 * (5500 / 1000) * $0.12 = $0.05
- Mashout: 20 minutes at 100% power usage = (20 / 60) * 1 * (5500 / 1000) * $0.12 = $0.22
- Sparge: Heating elements not used, minimal power usage.
- Bring to boil: 23 minutes at 100% power usage = (23 / 60) * 1 * (5500 / 1000) * $0.12 = $0.25
- Boil: 60 minutes at 85% power usage = (60 / 60) * 0.85 * (5500 / 1000) * $0.12 = $0.56
- Chill: Heating elements not used, minimal power usage.
While the pumps and the control panel are run for many hours throughout the brew day, they only add a few pennies to the overall cost given their low power consumption (relative to the heating elements).
Keep in mind too that ever beer is different. You may choose to shorten or lengthen some of these steps which in turn affects the electricity usage.
How long does it take to heat with electricity?
A 5500W heating element such as the one we use will raise the temperature of 1 gallon of water by 1 degree Fahrenheit in approximately 1.6 seconds.
Some real world examples using our setup for brewing 10 gallons of finished product:
- Heat 20 gallons of strike water from 70F to 155F: 45 minutes
- Bring 14 gallons of wort from 150F to boil: 23 minutes
Unlike conventional gas burners where heat is applied from below, an immersed electric heating element is 100% efficient as all of the heat is transferred to the surrounding liquid. With a gas burner 50-80% of the heat bounces off the bottom of the kettle and is lost.
Where is your brewery located?
Our brewery was originally located in a basement cold storage room under the front steps of our house. Other than a vent or two, from the outside it wasn't obvious what lurked under those front steps. The brewery room was fairly small at only 5.5 feet wide by 11.5 feet long with a 7 foot ceiling, and was accessed through a door in the basement.

 Original basement cold room Electric Brewery, circa 2009
In 2011 we moved and shortly after started planning a basement with a dedicated brewery. This was completed in early 2013. We now have considerably more room to work in and have combined the brewery with fermentation, conditioning, and serving. The new brewery uses identical parts and the same layout, but offers more room and uses stainless work tables instead of a wood stand.
 Redesigned new basement brewery, circa 2017
 View from the bar in to the new brewery
What kind of beers do you brew? What have you brewed?
We've brewed various styles of beer from 3% English Milds to 12% Barleywines and everything in between.
All our beers are brewed with fresh (sometimes organic) ingredients and are created to be full-flavoured. We always perform full wort boils in order to produce the best quality beer possible. We do not dilute with water. No shortcuts, no compromises. Our brewery was designed to be flexible, allowing us to brew any type of beer imaginable from old world styles to future styles that have not even been invented yet. We typically brew about once a month.
Our favourite recipes can be found in the Recipes section of the website.
Can you make Miller / Coors / Bud light with your brewery?
Yes you most certainly can. You can make any type or style of beer imaginable with this setup using any ingredients you like. The principles we apply are identical to what a major brewery would use.
Most brewers who go to the trouble of building such a home brewing system however are usually not interested in brewing these light beers. They may start off as Miller / Coors / Bud drinkers but upon discovering that beers with interesting flavours and aromas exist, most never go back to making these run of the mill varieties.
That said, we do try to keep one lighter style of beer available on tap at all times to keep all of our visitors happy. Even our lightest beers are (purposely) made with more flavour than most mass-produced beer however.
How do you serve your beer?
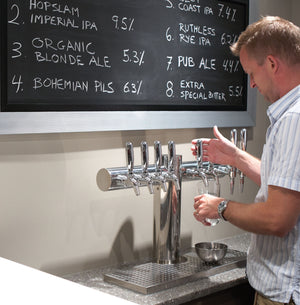
Our beer is kept in stainless steel Cornelius kegs (old soda kegs) that are popular with home brewers. In the basement bar the beer is served through an 8-tap tower with six Vent-Matic faucets (now discontinued, but similar to Intertap faucets) and two stout faucets. A portable kegerator with two Perlick faucets is also used outdoors in the summer. Tanks of CO2 and nitrogen/CO2 blend are used to carbonate and dispense the beer.
How long did it take you to build this brewery? How long will it take me?
Approximately one year (on and off) was spent researching, designing, and building our Electric Brewery. The entire process was photographed from start to end. 60-70% of the time was spent on research and design, 20% on the photographing, and then less than 10% on the actual building. Documenting the build process after the fact was considerably more time consuming than anticipated. ;)
If someone had all of the parts laid out in front of them it would probably take them a week or two of working evenings to assemble a similar Electric Brewery based on our instructions. This assumes you build absolutely everything from scratch.
Purchasing items pre-assembled and tested by us (such as the control panel, heating elements, temperature probes, and HERMS coil) would greatly reduce this build time as these components are the most complex. They represent 90% of the work in building your brewery. The rest is straight forward and involves attaching a few pieces of plumbing to the kettles, pumps, and chiller. Anyone handy with a screwdriver and wrench should feel right at home following our instructions and be done in an evening or two.
 Work goes faster (?) if you have helpers
I don't have time to build this / I want to buy a setup like this. Will you sell me a setup like yours?
Our shop features parts, kits, and pre-assembled products for those who don't want to build or source parts themselves. Assembled products are carefully hand built, tested, and calibrated right in the USA.
Don't see something listed that you're interested in? Email us and let us know. We are always working on bringing special products on board.
What's your brew day like?
Take a look at our Brew Day Step by Step guide for a complete walkthrough of how we brew beer on our Electric Brewery setup. It includes many videos that show our setup in action throughout the brew day. Videos can also be found on our Instagram, Facebook, Twitter (X), and Threads feeds. Our various Using Your Brewery guides and recipes also include hundreds of pictures and videos.
How can I know when new information is added to the site?
The best way to stay in informed is to follow us on Instagram, Facebook, Twitter (X), or Threads. We post photos and videos as we go about our day to day beer-related activities including brewing, fermenting, kegging, etc.
Site updates are also tracked on our What's New page.
You may also sign up for our newsletter (see the bottom of every page). We'll send you an email periodically with a list of the new information that has been added.
Do you have a full schematic of your control panel available?
We do not. Sorry! We did not follow any schematics or instructions when we built it as it was our own design. The wiring is actually really straight forward so there was no need for us to draw up anything beforehand.
The simplified wiring diagrams on our site are provided so that others without electrical engineering experience can understand how to do it. We appreciate that a "real" schematic would probably be easier for someone with electronics experience but at the same time someone with this experience should find the build very straightforward.
Why didn't you use <some part name> instead? Wouldn't it cost less?
The best way to understand why we designed our brewery the way we did and used the parts we did is to read the corresponding Building your Brewery guides. We provide detailed information on the design choices we made and often compare our choice to the other options available.
Remember as well that (within reason) cost was the last factor we considered. Functionality, ease of use, safety, and durability were placed before cost. We firmly believe that a properly designed system using quality components will far outlast one made with cheap components and end up costing less to use in the long run.
How long does it take to brew beer with your setup?
Similar to other all-grain home brewing setups (gas or electric), it takes anywhere from 3-6 hours to produce the sugary-sweet malt/hop liquid called 'wort'. This is what our Electric Brewery produces. Yeast is then added and left to ferment the wort into beer. The beer is then kegged and carbonated with CO2 before consuming. Lagers and stronger ales may be left to age or condition for a month or more to smooth out the flavours. Every beer is different.
See our Brew Day Step by Step guide for more information on how to use our brewery, including many videos that show our setup in action.
Have you written any guides similar to this one?
Yes we have! We're big home theater buffs (nothing like a beer while watching a movie!) and have also written a guide that helps you get the absolute best picture out of your TV/projector called Greyscale & Color Calibration for Dummies. This is a free guide meant for beginners with no prior knowledge or understanding of what display calibration is or why it may be required. It works on any TV or projector.
