Making a Yeast Starter
- Introduction
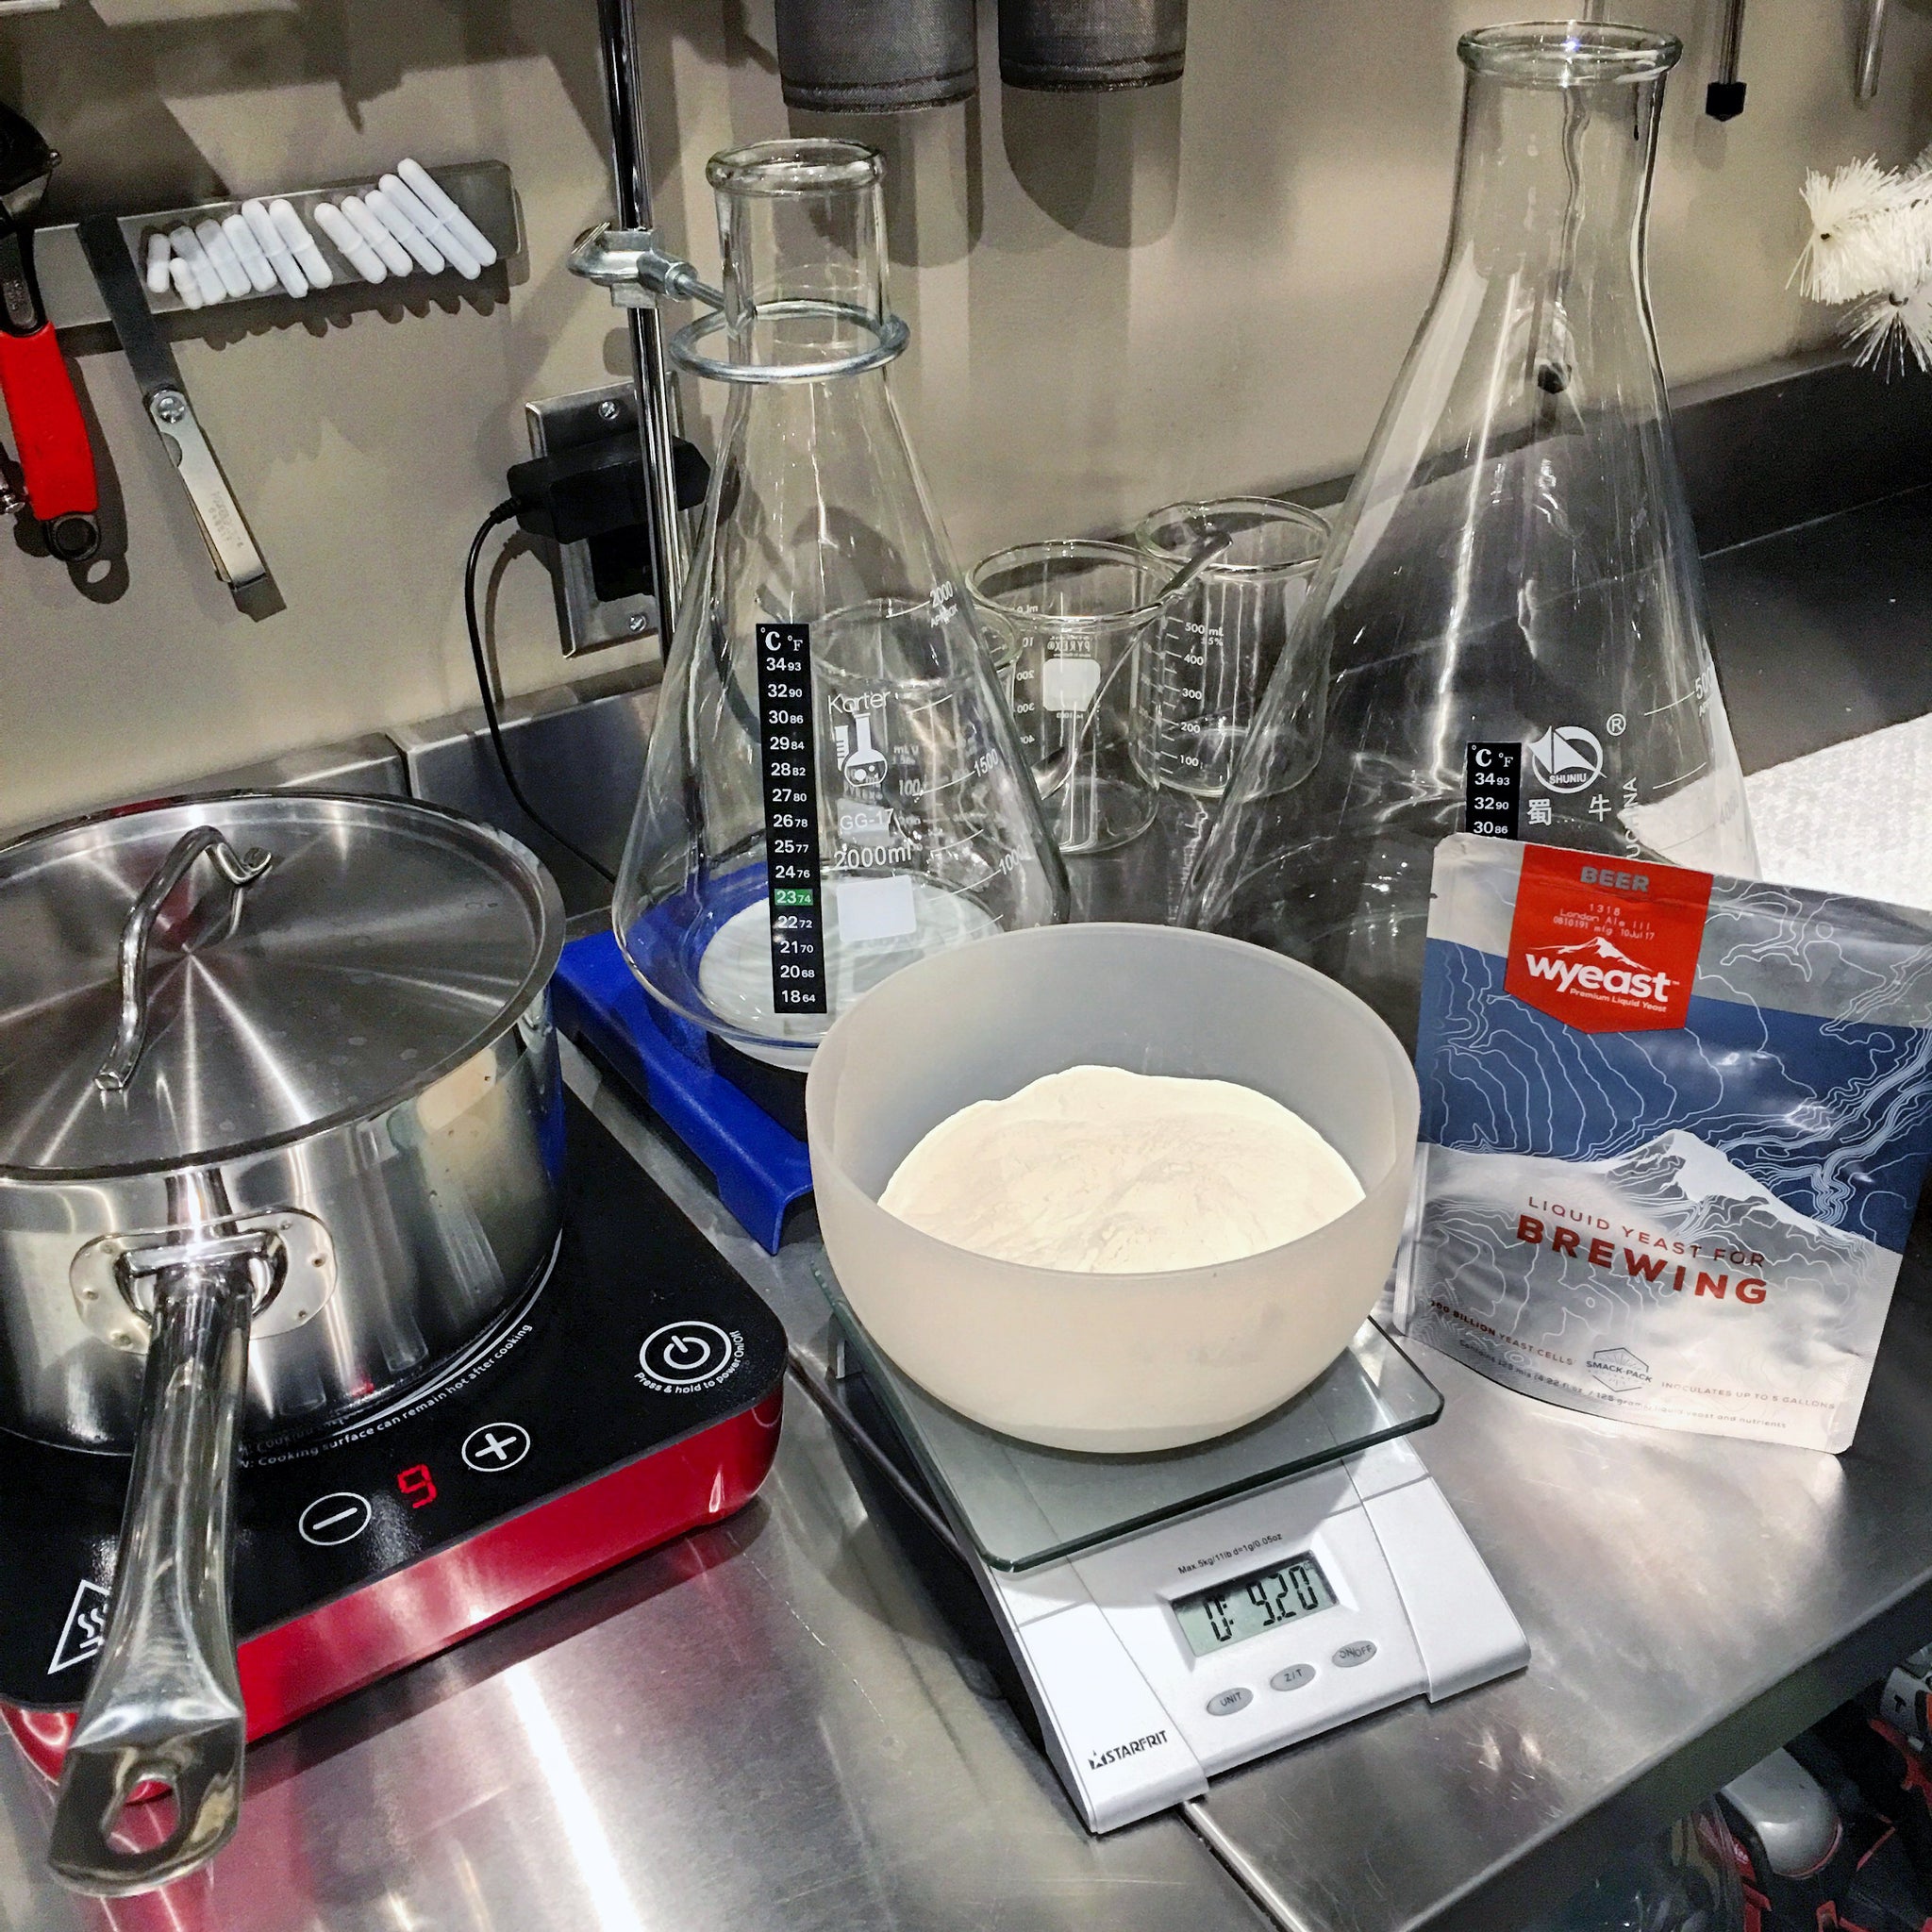
- Parts and tools
- STEP 1: Calculate starter size
- STEP 2: Measure out dry malt extract (DME)
- STEP 3: Boil starter wort
- STEP 4: Dilute and chill starter wort
- STEP 5: Pitch yeast and ferment until complete
- STEP 6: Chill starter to separate yeast from beer
- STEP 7: Decant beer and pitch yeast on brew day
- Hints / FAQ
- Pictures / Videos
Introduction
A yeast starter is simply a fancy way of saying that you're going to grow more yeast cells. How much yeast is required depends on the beer: The higher the alcohol content, the larger the batch, and the lower the fermentation temperature, the more yeast cells you'll need.
Why? Generally speaking a higher pitch rate (more yeast cells per volume of wort) leads to cleaner flavour profile because the yeast spend more time turning sugar into alcohol and less time reproducing. Reproducing is messy and tends to throw off flavours (there's a joke in here somewhere 😉). While a lower pitch rate can bring out more yeast derived flavours or esters (something you may or may not want depending on the beer style), it can also lead to inconsistencies from batch to batch. Excessive yeast growth is rarely optimal for beer flavour.
No brewer works in perfectly sterile conditions either, so fermentation is always a race against the yeast we pitch and any dust borne wild yeast and bacteria that are floating around in the air. Leave wort out long enough and it will eventually ferment using whatever it picks up from the air, with unpredictable results. By pitching higher amounts of the yeast we want we are stacking the odds in our favour, helping ensure the highest level of consistency from batch to batch.
Yeast is usually sold in little pouches or vials and comes in either liquid or dry form.
Liquid yeast is a living creature that slowly dies off over time starting from the day it was first created by the manufacturer. Every day more cells die off, lessening the number of cells that can turn your wort into beer. Within ~6 months there's usually only a small fraction of viable yeast cells left.
Active dry yeast (a dehydrated version of liquid yeast) on the other hand tends to be shelf-stable and can last for years without noticeable drop in viable cells. Successful dehydration of liquid yeast (along with rehydration) is unfortunately difficult so dry yeast strain selection is limited compared to liquid strains. There are certain liquid strains that are fragile and simply cannot be dehydrated successfully with today's technologies.
Making a starter a few days before your brew day therefore lets you ramp up the amount of yeast, replacing dead cells, and even increasing the cell count well beyond the original count when the yeast was fresh. Making a starter also allows you to effectively use packs that are beyond the 'best before' date. More information in the 'Hints / FAQ' section below.
Since yeast is expensive compared to the other ingredients used in making beer, many brewers will simply step up the amount of yeast from a single pack by making a starter instead of buying more packs of yeast. That's what we do. A starter is simply a small unhopped beer, who's sole purpose is to allow the yeast to reproduce. You cultivate this yeast and then (usually) throw away the resulting 'beer', keeping only the yeast. This is done by making a small batch of lower gravity (1.036 - 1.040) wort by boiling dry malt extract (DME) and allowing it to ferment to completion. Lower gravity is best as it maximizes healthy yeast growth. The more yeast you need, the larger the starter you need.
For more information on yeast starters, storage, and culturing, refer to the excellent book Yeast: The Practical Guide to Beer Fermentation.
Yeast pitch rates and starter sizes are controversial. Do what works for you, but the steps below are what we feel over the years has helped us produce extremely consistent beer with excellent quality when using liquid yeast, especially for clean tasting lagers where most yeast derived flavours are out of place.
When brewing with most dry yeasts we usually do not make starters but instead simply pitch the amounts listed in our recipes as some dry yeasts are considerably less expensive and have a much longer shelf life compared to liquid yeast. We also find that the amount of dry yeast recommended by the calculator below to be excessive. We recommend sticking to the amounts of dry yeast listed in our recipes as they've always produced excellent results.

Parts and tools


Purchasing through our affiliate links helps support our site at no extra cost to you. We thank you!
STEP 1: Calculate starter size
Starter size is usually denoted in litres (L). This will be the amount of 1.036 - 1.040 gravity wort you need. The higher the gravity of the actual beer you're brewing, and/or the larger the batch, and/or lower the fermentation temperature, the larger the starter you'll need as you need to grow more yeast. The larger the starter, the more dry malt extract (DME) you'll use. Here's a great calculator for figuring out starter size and the amount of extract required:
https://www.brewersfriend.com/yeast-pitch-rate-and-starter-calculator/
To use the calculator you must enter the date the yeast is manufactured. As of 2020, both Wyeast and White Labs have replaced the manufacturing date on their packaging with a less useful best before date, leaving brewers guessing as to when the yeast was manufactured. In both cases the manufacturing date is approximately 6-7 months earlier (give or take). White Labs offers a lookup tool that provides details through the lot number.
Various pitch rates (multiplication factors) are available depending on what type of beer you're making (ale vs hybrid vs lager) as fermentation temperature plays an important role. For example, lagers usually ferment around 50F, hybrids around 60F, and ales higher than that. The higher the fermentation temperature the more active the yeast is, so the less yeast that is required.
We tend to go with the following multiplication factors:
- For ales under 1.060 we use 'Pro Brewer 0.75'
- For ales over 1.060 we use 'Pro Brewer 1.00'
- For hybrid beers below 1.060 (Kolsch / Altbier / California Common) we use 'Pro Brewer 1.25'
- For lagers under 1.060 or hybrid beers above 1.060 we use 'Pro Brewer 1.50'
- For lagers over 1.060 we use 'Pro Brewer 2.0'
For really high gravity beers (over 1.100) you may want to bump the multiplication factor up a level or even two. You really can't have too much yeast with really high gravity beers.
Once calculated make note of the starter size recommended (in litres) and the amount of dry malt extract (DME) required (in oz). If the starter size is less than 2L a 2000ml flask will be used. If the starter is larger than 2L (but smaller than 5L), a 5000ml flask will be used. If a starter larger than 5L is required, you will be required to go through these steps multiple times until the target yeast amount is achieved (see "My flask is too small!" in the Hints / FAQ section below).
STEP 2: Measure out dry malt extract (DME)

Use a scale to measure out the required amount of dry malt extract (DME) calculated in the previous step.
STEP 3: Boil starter wort

Boil the dry malt extract (DME) for a few minutes in the 3.5 quart saucepan with enough water to melt and boil the extract. This is quick and easy with a portable induction cooktop. Don't worry about the exact amount of water. Only a few minutes of boiling is required as all you want to do is dissolve the DME and sanitize, we're not making beer here. Watch for boil-overs.
Some brewers like to also add yeast nutrients. We normally do not use any in our starters as malt based wort is already an excellent source of the carbohydrates, amino acids, vitamins and minerals that yeast requires for successful fermentation. There is no harm however in supplementing if you have concerns with the health or performance of your yeast, especially when making a starter from yeast that has already been pitched multiple times. Refer to the instructions for your specific yeast nutrients for usage rates if you wish to use them in your beer.
STEP 4: Dilute and chill starter wort

Place the 3.5 quart saucepan with boiling wort in an ice bath to chill partially. We don't want to pour boiling wort directly into a glass flask (warm is fine).
Dump the warm wort into a flask that already has a bit of sanitized / boiled cold water in it, and then fill the flask with more sanitized / boiled cold water until you reach the recommended starter size you wrote down in step 1. It's not critical that you be exact here. If the total is a bit more or less you'll be slightly above or below 1.036 - 1.040 gravity. That's fine.
Loosely place a piece of aluminum foil over the neck of the flask or use a foam stopper. Both work, but a foam stopper is recommended if you have fruit fly or other bug issues in your house. Do not use an airlock as it only allows CO2 to escape. Later on when we ferment the starter we want atmosphere to be introduced into the flask to aerate the wort for maximum yeast growth.
Never use a sealed stopper of any sort at this step (such as a rubber bung) as the wort will contract as it cools and may cause the flask to shatter!
If required, place the flask in a fridge for a few hours to cool to around 72F room temperature (or use an ice bath to chill in minutes). Stick-on strip thermometers are a surprisingly accurate method for measuring the wort temperature as long as the liquid is in motion (give the flask a swirl for a few seconds for an accurate reading).
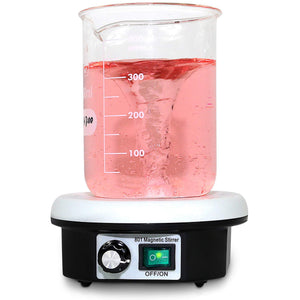
STEP 5: Pitch yeast and ferment until complete

Remove the liquid yeast from the fridge and allow it to warm up to room temperature. If it's a Wyeast smack pack, feel free to follow the manufacturer instructions and break the inner nutrient pouch (optional). The small pouch contains nutrients and a tiny bit of wort that is normally used to 'proof' the pack to confirm viability when not making a starter.
Once the wort is around 72F room temperature place the flask on the stir plate, remove the aluminum foil or foam stopper, pitched the yeast, and drop the stir bar in. Place the aluminum foil back over the neck of the flask (loose) or replace the foam stopper. Run the stir bar for 24-48 hours at high speed. Ideal is to have a funnel that reaches all the way to the bottom of the flask when you first start fermenting as it helps to aerate the wort.
Starters are usually fermented at room temperature or slightly above (even for lagers) as we're making yeast here, not beer. A 75-78F fermentation temperature is ideal. The stirring and friction actually helps create some heat to keep the temperature in the ideal range when making starters at room temperature. Active fermentation will also raise the temperature by a few degrees. No need for a heated stir plate. The temperature can be easily (and accurately) monitored with a stick-on strip thermometer as the liquid is in motion.

When fermentation is done the wort colour will be lighter, the krausen (foam) will have fallen completely, and the temperature will have dropped back down closer to the ambient room temperature. Fermentation usually takes 24-48 hours but can take longer if the yeast is more than a few months old. Very old yeast can take 2-3 days before any active signs of fermentation (raised temperature and krausen). When fermentation appears complete we usually leave it for another 8-12 hours just to be safe.
STEP 6: Chill starter to separate yeast from beer

Place the flask in a fridge for 12-48 hours to allow the yeast to settle out (keep the aluminum foil on the neck). Different yeasts will have different settling rates or 'flocculation'. Some such as Wyeast 1968 London ESB Ale yeast or White Labs WLP002 English Ale yeast will seem to drop clear in literally minutes, while others can take a couple of days.
STEP 7: Decant beer and pitch yeast on brew day

On brew day carefully pour off (decant) the beer and discard, leaving the yeast behind in the flask. We only want the yeast. We don't want to throw off the taste of the new beer with this starter 'beer' or water it down. Feel free to taste this unhopped / stale starter 'beer' if you want before discarding and you'll see why you don't want this in your 'real' beer. Make sure the yeast has completely settled out before decanting the beer. Separating the spent wort from the yeast too early may discard the less flocculent, higher attenuating individuals in the yeast population.
Once decanted, allow the yeast to warm up to room temperature and then add a few cups of the newly created fresh wort to the flask and swirl to help unstick the yeast from the bottom. Pitch the yeast in your newly brewed wort. That's it!
Some brewers prefer to pitch the entire starter at high krausen when the growth phase is mostly complete and the yeast are the most active. Possible flavour issues aside from not decanting the starter first, it's best to keep the starter within 5 to 10F of the target wort temperature as any time yeast sees a big drop in temperature it stuns the cells causing them to slow down and drop out. If you prefer to pitch at the height of activity (not allowing the yeast to settle out and decanting), it's best to keep the starter closer to the fermentation temperature from the beginning. This is easy to do with ales fermented near room temperature, but not so obvious for lagers fermented around 50F.

Hints / FAQ

Can I save wort to make starters? Can I buy pre-made wort?
Instead of using dry malt extract (DME) some all-grain brewers will make an unhopped 1.036 - 1.040 gravity wort made entirely with a lighter grain (such as domestic 2-row) to store and use later for making starters. This can done by either making an entire batch just for starters, or by making a little bit of extra beer on a 'regular' brew day and putting it aside. Be careful storing wort for any extended period as you risk botulism if done improperly. Some brewers will use a pressure cooker / canner to store their wort. Don't want to make wort? Consider using Propper Starter condensed wort instead.
My flask is too small!
If you're finding that you need a starter that is larger than your flask size you'll have to go through all of the above steps more than once, decanting the spent wort between steps and keeping the yeast for the next step. This of course takes longer so you need to plan ahead. We brew 10 gallon batches and find that a 5000ml flask is large enough for everything but the highest gravity beers. When making multi-step starters start with a smaller size first and work your way up as this helps maximize growth rate while reducing the amount of DME required. Play around with the calculator we recommend above to see how this works. Why does this occur? Yeast reproduces until it achieves a desired cell density per volume of wort per degree Plato. Because of this, the ideal inoculation rate to maximize cell reproduction is to pitch yeast into a 1.036 gravity wort at a rate somewhere between 50 - 125 million cells/milliliter. Any higher or lower and the growth rate is reduced. For example, pitching a brand new pack with 100B cells into 2 litres results in an inoculation rate of 100000/2000 = 50M cells/mL and takes our yeast count from 100M to 368M cells, a growth factor of 3.7. Decanting and pitching the resultant 368M cells into a new second 2 litre starter results in an inoculation of rate of 368000/2000 = 184M cells/mL and takes our yeast count from 368M to 568M, a reduced growth factor of 1.5 even though the second starter size is the same. This is because the starting cell density for the second step is closer to the target the yeast is trying to achieve, so less reproduction is required. For more information refer to chapter 5 "Yeast, Growth, Handling & Storage" in the book Yeast: The Practical Guide to Beer Fermentation.
Can I boil directly in a flask?
Some people prefer to boil the entire starter directly in the flask over a stove instead of in a sauce pan. Caution should be exercised if heating directly in a flask. Some manufacturers will indicate that a boiling flask should be used instead of an Erlenmeyer flask. Regardless of what type is used, a flask should never be directly heated on an electric stove with coil elements without some form of heat diffuser as the concentrated heat increases the chances of cracking. Cracking is more likely to occur too if the flask is only 'student' grade and not 'laboratory' grade (most reasonably priced flasks are only 'student' grade and may contain tiny air bubbles that can expand causing the glass to shatter at extreme temperatures). Placing the flask in a saucepan with a few inches of water is safer as if the flask does crack the saucepan will hopefully catch most of the mess. We prefer to boil in a small 3.5 quart saucepan, partially chill the wort, and then pour into a flask partially filled with sanitized / chilled water located in our sink. This way the thermal shock is lessened and if something was to happen, the wort goes down the drain.

Use a support (retort) stand to hold large flasks
We've never been overly comfortable with giant 5000ml flasks sitting on small stir plates as things do sometimes vibrate slightly and some yeast can get pretty chunky as it reproduces (like WLP002) which may eventually throw the stir bar, causing more bumps. We use a heavy lab support stand with ways to hold the flask, just to be safe. It comes with both a retort ring (perfect for a 2000ml flask) and a clamp (perfect for larger 5000ml flasks). We also tend to run the stir plate pretty fast, mostly based on Kai's study which says faster results in more yeast growth. Last thing you want is a couple of litres of sticky wort dumped all over the counter a day or two before you want to brew. Large stir plates are available but they're often huge, considerably more expensive, come with features we don't need (like timers), and take up a lot more room. Plus, lab stuff just looks cooler.😉
How do I remove the stir bar?
When you're done making the starter and want to get the stir bar out of the flask for a second starter or before you pitch, use a rare earth magnet on the outside of the flask to pull it up the side. While there's no harm in accidentally dumping the stir bar into the fermenter (we've all done it), you will invariably forget it's in there and will end up pouring it down the drain when you go to wash the fermenter in a few weeks. Always good to have a spare stir bar or two.
My yeast pack is really old! Can I still make a starter?
Got a really old pack of yeast that's well beyond the manufacturer "best before" date? Assuming the yeast was properly stored cold in the fridge for its entire life, there will still be some cells left, even a year after the best before date. Simply assume you're starting with 1 billion cells (instead of 100 billion or more) and make a starter. Allow a day or two lag time before you see any activity as it's starting from next to nothing to build up a culture of healthy cells. We've successfully made starters with vials 18 months past the best before date using this method (see videos below).
After my starter is done, how long can I keep it before using it?
Just like the yeast you purchased in the pack, the yeast in the starter is a living creature that slowly dies off over time. Every day that starter sits in your fridge more cells die off, lessening the number of cells that can turn your wort into beer. Because of this, it's best to use starters as soon as possible, ideally just a day or two after the starter has settled out in the fridge. The calculator used above attempts to estimate the amount of cells left in a store bought pack based on the manufacturing date. This same calculator can be used to estimate the cells left in a starter by using the date your starter finished as the 'manufacturing' date.

Pictures / Videos
Interested in seeing what we're brewing right now? Follow us on Instagram for pictures and videos of our brewing activities as they happen.
