Boil Kettle
- Introduction
- Parts and tools
- STEP 1: Install the Hop Stopper filter screen
- STEP 2: Add a temperature probe
- STEP 3: Add a quick disconnect to the ball valve
Introduction
Before hops are added this malt sugar solution is called 'sweet wort'. After it is simply called 'wort'. It's not considered 'beer' until later when the yeast has been added and has had a chance to convert the sugars into alcohol.
After the grains are soaked (mashed) they are rinsed and the resulting sweet wort is pumped to the Boil Kettle.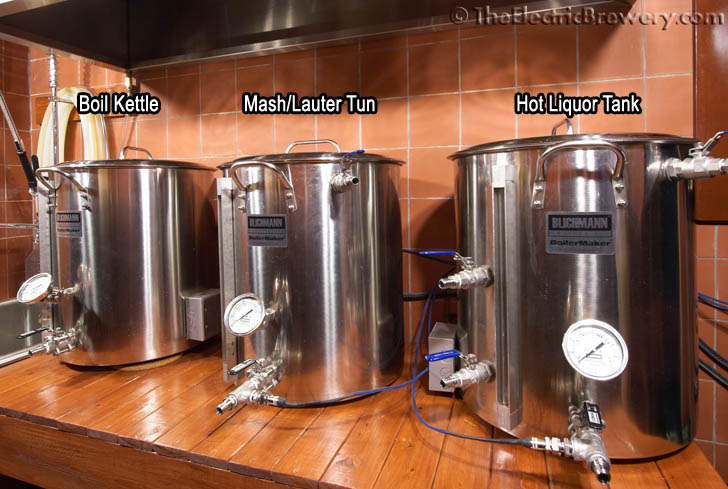
Building the Boil Kettle is the most straightforward of all three kettles. The heating element should already have been added to your Boil Kettle as per our Heating Elements article. The instructions below will now show you how to install a Hop Stopper filter screen, a temperature probe, and a quick disconnect to the existing ball valve so that hoses can be connected to the kettle output.
Parts and tools
The following parts are needed:
- (Qty: 1) Stainless steel Hop Stopper filter screen
- (Qty: 1) Stainless steel male quick disconnect 1/2" NPT male
You'll also need the following tools:
- GreenLee 9/16" round chassis or radio (not conduit/pipe) punch for making 9/16" diameter holes
- GreenLee 36414 1-3/8" step drill bit
- Hand drill
- Adjustable wrench
- Phillips #2 (crosshead) screwdriver
- 9/64" Hex key
- Cutting fluid
- Sharpie permanent marker
- PTFE white Teflon thread sealant tape
Some sellers do not ship outside the USA. If you live outside the USA (like us), we recommend using a forwarding service such as Shipito. We've used them to ship to Canada. The good news is that shipping within the USA is very inexpensive or often free. You then simply pay a small forwarded fee plus the cost of whatever shipping method you choose (USPS, FedEx, etc.). They will even consolidate multiple packages into one to save on shipping. We recommend USPS whenever possible to minimize brokerage fees.
Purchasing through our affiliate links helps support our site at no extra cost to you. We thank you!
STEP 1: Install the Hop Stopper filter screen
After the wort has been boiled it needs to be removed from the kettle leaving behind as much of the solids as possible, such as hops and hot break material (the protein clumps that coagulate in the first few minutes of boil). A filter of some sort if required to do this. The product we use is called the Hop Stopper. It's a large stainless steel mesh screen that covers a dip tube that extends down to the bottom of the kettle. The bottom of the dip tube is notched such that wort flows into it from all sides. We use an all stainless steel version instead of one with copper/brass parts as stainless steel is easier to clean, stronger, and holds up better over the years to contact with acidic liquids such as beer.
Blichmann Engineering (the manufacturer of our BoilerMaker kettles) used to sell a boil filter screen for their kettles but brewers noted that it would often clog regardless of the amount of hops used. Today, their boil filter screen is no longer sold. Instead, Blichmann now offers a product called the HopBlocker that looks promising but seems it may have a few caveats for use in our setup: Before draining, the HopBlocker requires the brewer to whirlpool (quickly stir to form a funnel) at the end of the boil and then wait 15-20 minutes to ensure that as much hop and hot break material as possible settles in a cone at the bottom center of the kettle. This may work well with kettles that are heated by propane or natural gas burners from below, but it's likely that our electric heating element would impede the whirlpooling effect and possibly render the HopBlocker ineffective in our setup. Our Hop Stopper works remarkably well with no effort or waiting required so we have not considered replacing it with the Blichmann HopBlocker.
The Hop Stopper is installed in our Boil Kettle (BK) prior to the heating element being installed. The Original Blichmann boil filter is shown (not installed) for reference only to show the large size of the Hop Stopper. The Hop Stopper uses a finer mesh screen and is considerably larger in surface area:
Close-up of the original Blichmann boil filter with diverter cover removed next to the Hop Stopper:
Installation of the Hop Stopper is very simple:
- Remove the dip tube that was supplied with your BoilerMaker kettle (it simply pulls out of the drain fitting, no tools required).
- Remove the shaft collar from the dip tube by loosening the set screw with a 9/64" hex key.
- Slide the shaft collar onto the Hop Stopper dip tube. Do not tighten the set screw.
- Install the Hop Stopper in the kettle by sliding it into the drain fitting approximately 1".
- Slide the shaft collar onto the drain fitting until the pin engages the small hole in the drain fitting.
- Tighten the set screw with a 9/64" hex key.
The exact position of the shaft collar on the Hop Stopper dip tube is not critical: The Hop Stopper dip tube must insert far enough into the drain fitting to seal with the silicone o-ring, but not so far as to prevent the ball valve from opening and closing.
The Hop Stopper uses the same silicone washer seal as the original dip tube. Removing it to clean is as simple as pulling it out. No tools are needed.
Dip tube removed from the kettle. The shaft collar is still attached:
Dip tube with shaft collar removed using a 9/64" hex key:
Hop Stopper with the shaft collar attached, installed in the Brew Kettle: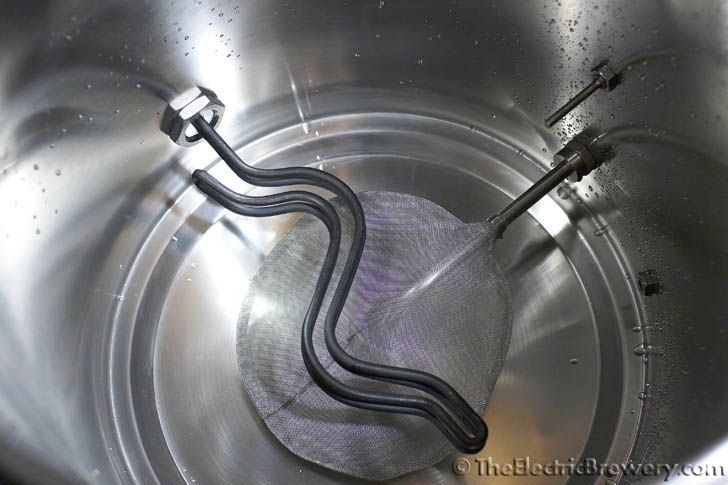
STEP 2: Add a temperature probe
The next step is to add a temperature probe to the Boil Kettle. It controls the heating element used to boil the wort. The temperature of the wort is displayed on our control panel as we ramp up from mash temperature to boiling.
We use a short 2" probe. There's no reason to use a longer probe as the liquid is always in contact. The shorter the probe, the easier the Boil Kettle will be to clean.
2" Metric (straight) temperature probe (shown without protective sheathing or XLR connector):
The probe has a metric (straight) thread so that it can be fastened to the kettle wall using the included silicone washer and stainless steel nut. An NPT threaded (tapered) probe such as those used in the Hot Liquor Tank and Mash/Lauter Tun cannot be used here as you cannot fasten them with a nut due to the tapered nature of NPT fittings.
In process control systems such as ours that involve fluid recirculating, temperature monitoring is usually done in the plumbing instead of in the kettle as it helps avoid temperature misreads due to stratification (layering). This is not an issue in the Boil Kettle as the violent boiling action continuously stirs the wort to ensure an even temperature throughout the kettle.
While a temperature probe for the Boil Kettle is not necessarily needed (water boils at 212F so there's really no need to monitor or control it), we do find that displaying and controlling the temperature in the boil kettle has benefits: It helps us minimize the chance of 'boil-overs'. When wort first starts to boil it foams up considerably. If left unattended (brewers are easily distracted), it will result in messy boil-overs. To avoid this we typically run the boil kettle heating element in what's called 'automatic' mode and set the temperature to just below boiling. We also set an alarm to sound once that temperature is reached. The wort is then automatically heated to just below the boiling point without actually going any higher, and an alarm sounds. At that time, we switch over to 'manual' mode and continue heating while watching and stirring to avoid the initial boil-overs.
Being able to control the temperature of the boil kettle is also useful when doing advanced hopping procedures such as a hop stand where you add hops after the boil is complete at varying times and then hold for 60-90 minutes at specific temperatures. Our control panel with advanced temperature control in the boil kettle allows this (unlike a dial-type boil control). This process is used by new popular beers like The Alchemist's Heady Topper. Our Electric Hop Candy (New England Style IPA) explains this process further.
 The temperature probe we use comes with a cable that disconnects from the probe, making cleaning of the kettle much easier. The probe as shipped does not come with black shrink wrap or blue flexible sleeving. In previous instructions we showed you how to add these as well as a stainless wire rope to help protect the cable from accidental breaks.
We use an RTD (resistive thermal device) Pt100 temperature probe. Thermocouple based temperature probes are also readily available and are often used in brewing setups. While either will work, an RTD will typically be more accurate and remain more accurate (offer better linearity) over the brewing temperature range we use. RTDs also remain more accurate over time (less drift which means less re-calibration). The cost difference between the two is negligible in our setup.
The exact position of the temperature probe in the Boil Kettle is not critical. We recommend placing it no higher than the heating element to ensure that the probe will always be submersed.
Punch a hole in the kettle using the GreenLee 9/16" round chassis to create a 9/16" diameter hole for the M14x1.5 probe. Refer to Step 4: Punch a hole in the kettle from the Heating Elements section for instructions on how to properly create clean holes using a punch like this.
Do not use step bits or drills bits exclusively as they do not create nice clean holes.
Breakdown of the Brew Kettle temperature probe connections:
(A) Silicone washer included with M14x1.5 probe
(B) Stainless steel hex nut included with probe (M14 size, 1.5mm pitch)
(C) Stainless steel liquid tight RTD sensor, 2” probe, M14x1.5 Metric thread
(D) GreenLee 9/16" round chassis or radio (not conduit/pipe) punch for making 9/16" diameter holes
(Note: The size of the silicone washer included with the probe has changed since these photos were originally taken)


The temperature probe wires attached:
To install, tighten the M14x1.5 hex nut on the inside of the kettle using a wrench while using a second wrench to hold the temperature probe steady on the outside of the kettle. Tighten until the silicone sealing washer is slightly compressed. Do not overtighten.
STEP 3: Add a quick disconnect to the ball valve
We need to be able to attach hoses to the kettle output so a quick disconnect is attached to the existing ball valve.
Wrap the threaded end with PTFE white Teflon thread sealant tape to ensure a tight, leak-free fit. Tighten using wrenches until the quick disconnect is firmly attached to the ball valve. Two wrenches are required: One to hold the ball valve steady to avoid it turning, the other to tighten the quick disconnect we're attaching.
Quick disconnect attached to the kettle output ball valve: 
Your Boil Kettle is done!
Continue on to Building Your Brewery - Brew Stand.
