Ventilation
- Introduction
- Parts and tools
- STEP 1: Choose a hood
- STEP 2: Choose a fan
- STEP 3: Build a fan speed control
- STEP 4: Install fan and ducts
- STEP 5: Mount the condensate hood
- EXTRA INFORMATION: Testing
Introduction
Brewing beer creates a significant amount of heat and moisture.
The Hot Liquor Tank and Mash/Lauter Tun create heat while heating strike/sparge water and mashing, however, the lids stay on most of the time, so very little moisture is created by these two kettles.
The Boil Kettle creates both heat and moisture as the wort must be vigorously boiled with the lid off to maximize alpha acid extraction from the hops, drive off unwanted volatile compounds, and coagulate unwanted proteins. A rapid simmer will not do; we need a vigorous hard (rolling) boil. Our setup boils off almost 2 gallons of water for each hour of boil. With typical boil times ranging from 60 to 90 minutes, with some as long as 120, this means that somewhere between 2-4 gallons of water is evaporated each time we brew.
A hard rolling boil is required when brewing beer: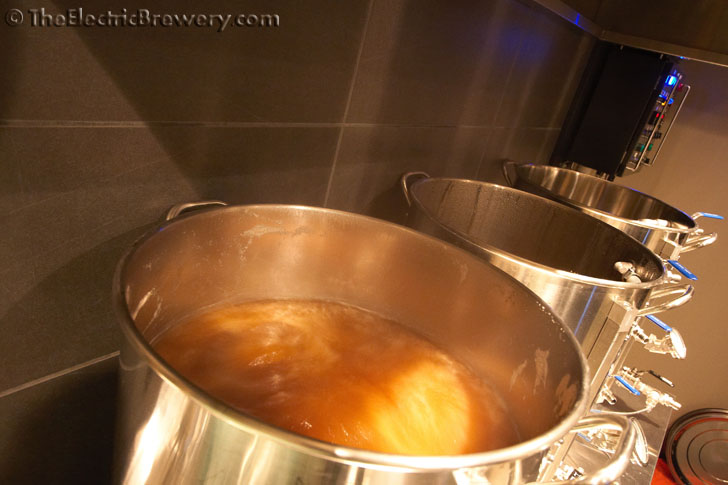

When brewing outdoors this is a non-issue: Mother Nature takes care of carrying it all off. An indoor electric setup however requires some assistance in the form of a vent hood and a fan to evacuate the heat, moisture, and smell outdoors. While we love the smell of grain being mashed (it's similar to the smell of bread baking), not everyone does.
One of the fundamental reasons why we chose electric over gas is that it is considerably easier to vent an indoor brewery safely when electricity is used to heat. Unlike conventional gas burners where heat is applied from below, an immersed electric heating element is 100% efficient as all of the heat is transferred to the surrounding liquid. With a gas burner 50-80% of the heat bounces off the bottom of the kettle and is lost. More heat must therefore be produced.
Due to the extra heat and poisonous gases that must be removed, the ventilation requirements are considerably higher with a gas brewery as compared to electric. John Blichmann wrote an article for the November 2012 issue of BYO magazine that summarized ventilation requirements as follows:
- Electric based brewery: Divide the element size (in watts) by 17.6 to obtain the required CFM (cubic feet per minute). In our case we use a 5500W element in our boil kettle. 5500 / 17.6 = 312 CFM. We therefore require a fan that can move a minimum of 312 CFM in order to ventilate our electric brewery properly. Fans this size are readily available and reasonably inexpensive.
- Gas based brewery: Divide the burner’s BTU/hour rating by 30. Because of the inefficiencies, a 80,000 BTU burner produces approximately the same amount of heat in the kettle as a 5500W element. 80,000 / 30 = 2666 CFM. We would therefore require a fan that can move 2666 CFM in order to ventilate a gas setup properly. A fan this size is not readily available. A commercial restaurant exhaust fan is likely required.
Because of the enormous ventilation requirements of a gas based brewery (8.5 times higher than an equivalent electric setup), an indoor gas brewery is not easily achievable. It requires a massive amount of air evacuation as well as an equally substantial make-up air system. Large fans with ducting larger than 16" in diameter may be required, making safe indoor gas brewing very expensive. It is not uncommon for the ventilation and make-up air system of a gas based indoor brewery to cost more than the brewing setup itself.
So why brew indoors at all? A few reasons come to mind:
- Comfort: No matter what the temperature outdoors, our brewery is always comfortable to brew in 365 days of the year. No rain or snow, and no parka is needed in the winter months.
- Consistency: Unlike the outdoors, our indoor electric brewery is always at the same temperature, humidity level, and there is (obviously) no wind. Brew outdoors at different times of the year and you'll experience different temperatures, humidity levels, and levels of wind. These all lead to different evaporation rates, which in turn leads to difficulties in producing consistent beer batch after batch.
We use a ventilation system that is able to evacuate all unwanted moisture and heat and confines any odours to the brewery. In this article we'll describe exactly how we accomplish this using a custom hood and an industrial fan.
The video below shows our ventilation system running at 100% while boiling 12 gallons of wort:
Our custom hood evacuates steam and heat from our brewery: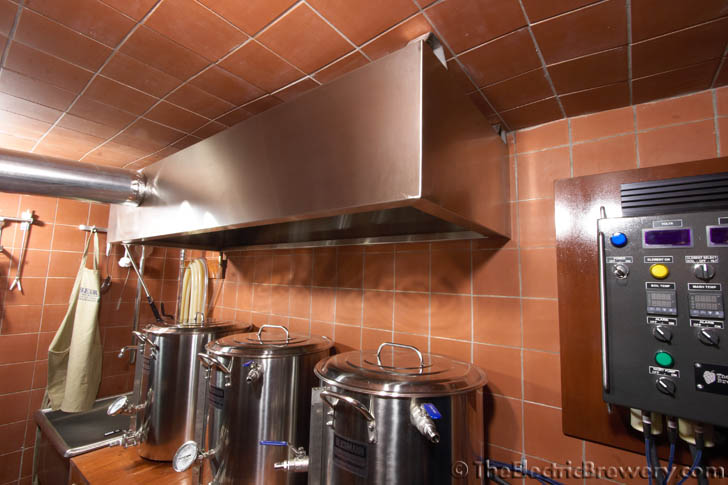
Parts and tools
The following parts are needed:
- (Qty: 1) Stainless steel condensate (heat) hood with full perimeter gutter & drain (67"W x 24"D x 12"H)
- or -
(Qty:1) Low cost range hood 30" wide (see text) - (Qty: 1) Vortex VTX600 6" Powerfan (452 CFM)
- (Qty: 1) Tube of all purpose clear silicone sealant
- (Qty: 1) KBWC-15K fan control from KB Electronics
- or -
(Qty: 1) Lutron quiet 3-speed fan control and
(Qty: 1) Weatherproof 2-gang outlet box with 1/2" holes and
(Qty: 1) NEMA 5-15 (125VAC, 15A) 2 pole 3-wire Decora duplex receptacle and
(Qty: 1) 18 AWG universal power cord, IEC320C13 and
(Qty: 1) 1/2" strain relief cord connector and
(Qty: 1) JB Weld cold weld compound and
(Qty: 1) Decora strap with .406" hole and
(Qty: 1) 2-gang Decora cover - (Length as required) 6" diameter rigid ducting (see text)
- (Length as required) Duct insulation (optional - see text)
- (Qty: 1) 4-6" metal dryer vent
- (Qty: 1) 4-6" metal fresh air intake vent with screen
- (Qty: 1) 50-year all-weather architectural grade silicone sealant
- (Qty: 1) Aluminum foil tape
- (Length as required) Metal strapping (see text)
- (Qty: 4) Lag bolt (as required - see text)
- or -
(Qty: 4) Concrete sleeve anchor (as required - see text) - (Qty: 1) Brass 1/2" NPT female x 1/2" barb fitting
- (Length as required) Vinyl (PVC) tubing 1/2" ID (see text)
- (Qty: 1) Hose clamp (5/16" to 7/8" diameter hose)
- (Qty: 1) Pink brewers leggings (optional - see text)
You'll also need the following tools:
Some sellers do not ship outside the USA. If you live outside the USA (like us), we recommend using a forwarding service such as Shipito. We've used them to ship to Canada. The good news is that shipping within the USA is very inexpensive or often free. You then simply pay a small forwarded fee plus the cost of whatever shipping method you choose (USPS, FedEx, etc.). They will even consolidate multiple packages into one to save on shipping. We recommend USPS whenever possible to minimize brokerage fees.
Purchasing through our affiliate links helps support our site at no extra cost to you. We thank you!
STEP 1: Choose a hood
 The first place that indoor brewers tend to look for venting heat and moisture are lower priced range hoods, the type that are typically used in the kitchen over stoves or cook tops, as they can be purchased for well under $100. These range hoods are usually underpowered for use when boiling a full 10-15 gallons of wort as the fans they use do not produce a high enough airflow (measured in CFM or cubic feet per minute).
Lower priced range hoods tend to use fans with blades which produce very little static pressure, meaning that they will only work as rated when venting directly outside through the wall (no duct at all). Add any amount of ducting and the airflow drops dramatically. The airflow drop is exacerbated with longer duct runs, runs with elbows, or smaller diameter ducts. It's not uncommon to see the airflow drop by 50-80% by simply adding a 10 foot duct with a turn or two. The little blade fan is unable to "push" the air adequately due to resistance.
Most indoor brewers are brewing in the basement and therefore require some length of ducting to vent the heat and moisture. Using one of these inexpensive range hoods with reduced CFM over 10-15 gallons of boiling wort (usually done with a 6-15 foot duct run) typically results in more humidity in the house than we'd like to see and condensation forming on the inside of the hood. This condensation then tends to drip back into the boiling wort. While using a lower priced range hood is better than nothing at all (any reduction of moisture is better than none), most brewers would prefer a better solution.
Inexpensive range hoods typically only come in one size too: 30" wide to fit over a standard range or cook top. While most of the heat and steam in our brewery comes from the Boil Kettle, we'd prefer to use a hood that covers all 3 kettles to adequately trap all heat and moisture. This means we need a hood that is at least 64" wide and 24" deep.
If you choose to use a lower priced range hood, place the fan intake directly over the boil kettle and try to minimize airflow restriction by venting directly outside through the wall. Minimize the use of ducts as much as possible. A better solution is to remove the hood fan completely and use a better inline fan (see next section for recommendations). You'll be using the range hood only to direct the heat and moisture.
Lower priced range hood (150-250CFM):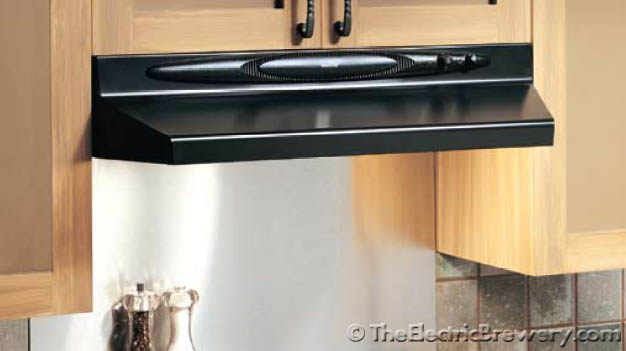
A typical blade fan with motor (low static pressure) found in most lower priced range hoods:
Professional range hoods are available that have considerably better airflow, better static pressure (able to drive long ducts), and come in larger sizes (some up to 66" wide or larger).
These range hoods use centrifugal (squirrel cage) fans that have a wheel composed of a number of ribs mounted around a hub. The hub is turned by a motor driven drive shaft. The air enters the center and is accelerated out the sides due to centrifugal force as it flows over the fan blades. This design allows centrifugal fans to create considerably higher levels of airflow at greater static pressures. This means that the performance is not affected as much by long duct runs. If your house has a forced air furnace it most likely uses a centrifugal fan (or blower) for this exact reason.
The only issue with professional range hoods is price: They tend to be extremely expensive, often many thousands of dollars. A high end range hood wide enough to cover all three kettles can easily cost well over $5,000 USD.
These range hoods also typically come with other features we don't need such as halogen lighting, heat lamps, automatic heat sensors, baffle filters, advanced grease traps (some that are auto-cleaning), and so on.
Unless you can find one used or from a restaurant going out of business, we don't recommend using a professional range hood as they're typically more expensive than the custom hood and fan solution we used.
Professional range hood (1100CFM):
A centrifugal fan (higher static pressure):
 So what to use? The low cost range hoods do not exhaust adequately for our use and the professional units are overly expensive partially due to extra features we will not use. We are not cooking here (there is no grease) so why pay for extras such as grease traps, filters and heat lamps, or more?
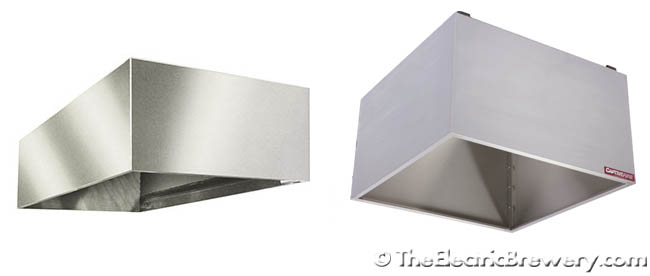
The answer came when looking at what restaurants and other industrial settings use to trap and manage heat and steam. They use what is called a "condensate" (or "heat") hood. This is a stainless steel box open at the bottom with a vent at the top. A full perimeter gutter with drain to trap and dispose of condensation is often included.
These hoods are simple as they are used only where non-grease heat, steam, or smoke is produced. You'll typically see them installed over dishwashers or pre-rinse sinks in restaurant kitchens. Since grease traps, filters, and other advanced features are not required, the design is much simpler, which helps reduces the cost. While still more expensive than lower priced range hoods, they are less expensive than large professional range hoods.
Some advanced condensate hoods use angled internal baffles and deflectors. This stops condensation from forming on the flat ceiling of the hood and dripping down. We were unsure if such baffles would be required in our condensate hood so tests were done first with a simple prototype hood (see the EXTRA INFO: Testing page). No issues were encountered with our tests so we chose to keep our hood design as simple as possible.
Advanced condensate hood with interior baffles: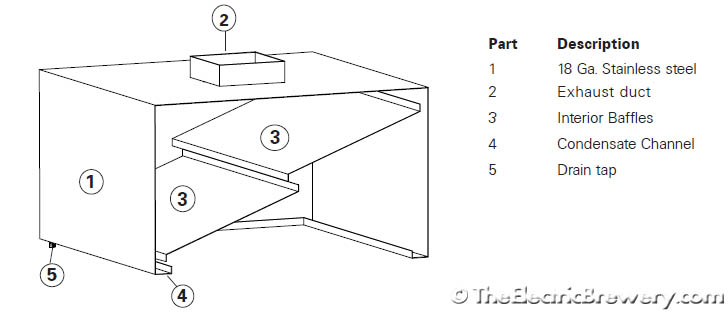
Our custom condensate hood has the following dimensions: 67" wide, 24" deep, and 12" high. This is wide enough and deep enough to fit over all of the kettles and still leaves enough room to work (dump in grains, stir the mash, etc.).
A trough and drain is used to capture any condensation. The drain was positioned so that it is close to our sink for easy water run-off. In practice very little (if any) water makes it from the trough to the sink.
Normally a condensate hood will vent out the top using an external blower or fan. Our brewery is fairly tight for space so we chose to vent out the side near the Boil Kettle instead. Our 12" high hood was installed flush with the ceiling as the room is only 7 feet high. If your ceiling is higher consider venting out the top and/or using a higher hood.
Be careful with the orientation of the hanging brackets. You will need to make sure that you'll be able to access the nuts on all four hanging bolts. In our setup the bracket openings are open to the short ends of the hood.
A hood like this is straight forward to build so we recommend also checking around your area for shops that have stainless steel welding experience.
We obtained multiple quotes from various shops in our area and ended up purchasing a unit built to our specifications from a restaurant kitchen hood manufacturer (FastKitchenHood out of Montreal, Canada). While this custom hood is certainly not inexpensive by any stretch of the imagination (around $750 USD in 2009), they manufacturer restaurant hoods for approximately half the price of what most places will charge you. It was delivered less than a week later. Great service. Tell Sandro that Kal from TheElectricBrewery.com sent you!
Our custom condensate hood design:
STEP 2: Choose a fan
 A condensate hood does not come with any sort of fan or blower so it's up to us to pick one.
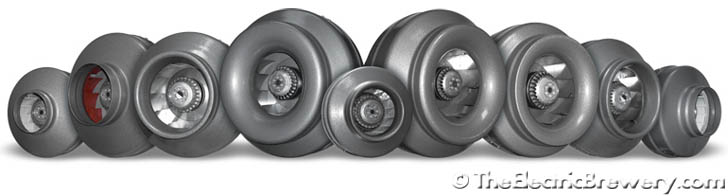
Our research led to the Vortex Powerfan line of high performance inline duct blowers built by Atmosphere Inc. just north of Montreal, Canada.
Vortex fans are high performance industrial centrifugal fans that are meant to be installed inline. They install directly to ducts that range in size from 4-12" in diameter. Airflow ratings start at 177CFM for the smallest 4" model up to 1140CFM for the largest 12" model.
Vortex Powerfan features include:
- True sizes in inches, eliminating duct adapters.
- Aerodynamic design allowing for more air flow.
- Heavy gage steel casing with a Hammertone powder coat finish, making it more sound absorbing, durable, impact resistant and rustproof.
- High quality maintenance-free balanced motor, making it vibration free, quieter and longer lasting.
- Extended collar and lip, allowing easy duct hook-up.
- Optional speed control easing air flow adjustment, allowing better balancing of the ventilation system.
- 115V, 6 foot power cord, ready to plug in.
These fans are incredibly silent when in use (you'll hear the turbulence of the air flowing through the hood, not the fan itself) due to the balanced motorized impellers with permanently lubricated ball bearings. They also maintain excellent static pressure, as the resistance increases the airflow remains considerably higher than what most other brands/models are able to produce. Vortex fans are sold with a (surprisingly long) 10-year warranty.
A heads up on Vortex fans: While doing research we found that Vortex fans seem to be the "go to" fan used by marijuana growers around the world who run them 24/7 (a good sign that they're quality fans). So don't be surprised if a seller advertises that they "ship in discreet packaging". ;)
For our application we choose the Vortex VTX600 Powerfan (6" duct size). It is capable of producing up to 452 CFM of airflow which is more than adequate for our brewery. A bigger fan can always be slowed down as required (more on this later).
Vortex 6" 449 CFM Powerfan (model VTX600):

VTX600 weight and dimensions: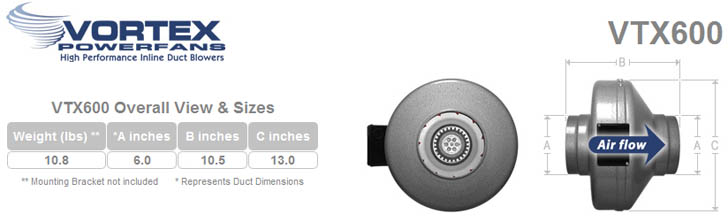
VTX600 specifications (flow rate does not drop off drastically as static pressure increases like most fans):
We confirmed with the manufacturer that the Vortex line of fans is appropriate for use in range hood applications where steam and heat are evacuated.
We do find, however, that some condensation forms on the inside of the unit when in use. If left to accumulate, this condensation may make its way in to the black electrical box attached to the side.
At the suggestion of the manufacturer, we leave the center screw off the bottom of the fan to allow any condensation to drip out.
We also removed the electrical box cover and sealed the wire entry point with all purpose kitchen/bath silicone sealant just to be safe. This will ensure that moisture is not able to pass from the fan chamber to the electrical box. We also recommend applying a thin bead of silicone around the perimeter seam between the two halves of the unit. This will ensure that all moisture is forced out the screw hole in a controlled manner and not out any small cracks or gaps.
Bottom center screw removed to create a drip hole:
Sealing the electrical box from the main fan chamber:
STEP 3: Build a fan speed control

If you have full control over your brewery room build, instead of building a fan speed control box consider using an industrial KBWC-15K fan control from KB Electronics installed directly in the wall beside the control panel. This is what we did when we built our new brewery in 2013. This fan control feeds an outlet hidden above our hood to power our Vortex fan. No separate (external) fan speed control box is therefore required and this step may be skipped.
When plugged in, the Vortex fan turns at full speed. This is perfect for evacuating heat and moisture from the brewery during the full wort boil, but overkill when we're heating strike water, mashing, or cleaning up. During those times we want the fan to run at a lower speed to only remove the excess heat from the brewery. To control the fan speed we use a Lutron quiet 3-speed fan switch in a simple box we built.
Regular light dimmers cannot be used as they reduce power by simply chopping up the AC sine wave which causes the fan to issue an annoying buzz whenever it is run at anything less than 100%. Fan speed controls are not the same as light dimmers: Most fan speed controls have built in noise reducing circuitry to avoid fan 'hum' (the word 'quiet' or 'silent' is often used in the product name).
Install the Lutron quiet 3-speed fan switch together with a NEMA 5-15 (125VAC, 15A) 2 pole 3-wire Decora duplex receptacle in a weatherproof 2-gang outlet box. An 18AWG universal power cord (IEC320C13) is used to supply power. A 1/2" strain relief cord connector is used at the entry point to the 2-gang outlet box. It is held in place permanently with JB Weld. A Decora strap with .406" hole is used to cover up the rotary fan control. A 2-gang Decora cover is used to cover the 2-gang outlet box.
The fan speed control box is then plugged into a standard 120V/15A receptacle and the fan is plugged into the speed control box.
Fan control wiring diagram: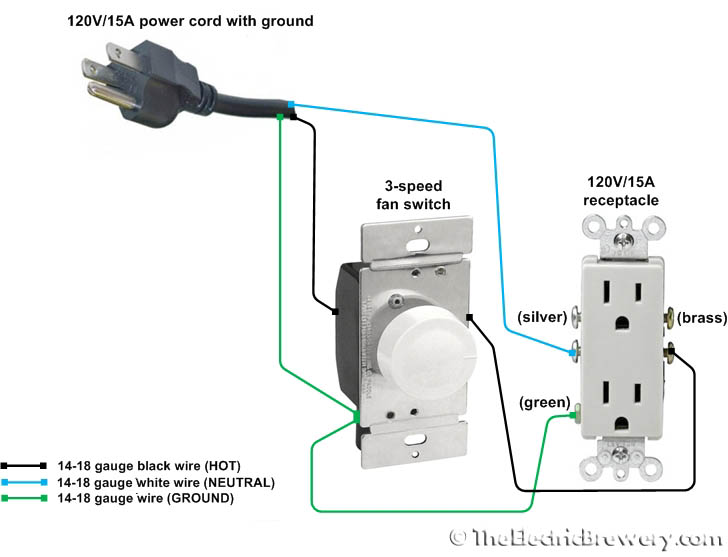
Components inside the 2-gang outlet box:

Assembled fan speed control box. The 3-speed fan control is rated to 600W (the Vortex VTX600 only draws 100W).

STEP 4: Install fan and ducts
 Before we install our hood, we'll be installing our Vortex fan and some of the ducts.
In order to evacuate heat and steam from the room, we also need to introduce make-up air to the room. Using air from the rest of the house would be a waste of energy during most of the year as the air has already been heated (or cooled). Instead, we allow air from the outside to enter the brewery through a second duct to make up for the air we're removing. When the fan is running the brewery door is typically kept closed to avoid exhausting air from the rest of the house. Two duct runs to the outside are therefore required: One to vent heat and moisture to the outside, the other to bring fresh air in.
Our brewing room was originally a cold storage room located under the front steps of the house. Two 4" diameter vents to the outside were already installed by the home builder. We replaced the existing vent covers with something adequate to exhaust steam and to introduce the make-up air. While 6" ducts would be preferred (to minimize air flow restriction) our tests have shown that we still have sufficient air flow even though the last 2 feet are only 4" in diameter. Increasing the diameter of these 4" holes that pass through the house's cement foundation would have been significant work.
 Every room or house will be different so we can't give specific instructions on how to position your fan or ducts. Lengths will all be different. Here are some tips:
- Rigid metal or PVC ducting should be used for all duct work instead of flexible ducting.
- Duct length and turns should be kept to a minimum and the diameter should also be kept to 6" as much as possible. Using smaller ducts, turns, or added length introduces restriction which reduces air flow.
- If the duct has seams these should be taped along the full perimeter with aluminum foil tape to avoid possible moisture leaks due to condensation.
- To minimize the amount of condensation within the ducts (we want to vent as much moisture outside as possible) use duct insulation which can be applied to the outside of the duct. Condensation occurs as the steam cools while it travels along the duct so keeping the air hot as long as possible helps reduce condensation. (We haven't bothered to do this in our brewery but it's something to keep in mind if you want to keep condensation to a minimum).
- Try and maximize the distance between the exhaust output and the make-up (fresh) air input. We don't want recirculation to occur where heat vented outside ends up returning back in the make-up air return. (Our setup has the two vents only 4 feet apart but we do not have any issues with recirculation).
Rigid ducts should be used, not flexible ducts:
4" diameter vents shown from inside and outside the brewery (the pink brewers leggings are optional):
A fresh air intake vent with screen was installed for the make-up air entry point. The screen helps keep critters and bugs out of the brewery. The vent was sealed with 50-year all-weather architectural grade silicone sealant.


An all-metal 4" dryer vent with hood was installed for the heat/moisture output. It includes a hinged weighted door so that it seals from the outside when air is not being exhausted. The vent was sealed with 50-year all-weather architectural grade silicone sealant.
Metal 4" dryer vent hood for our brewery exhaust (left). The existing vent cover (right) was first removed: 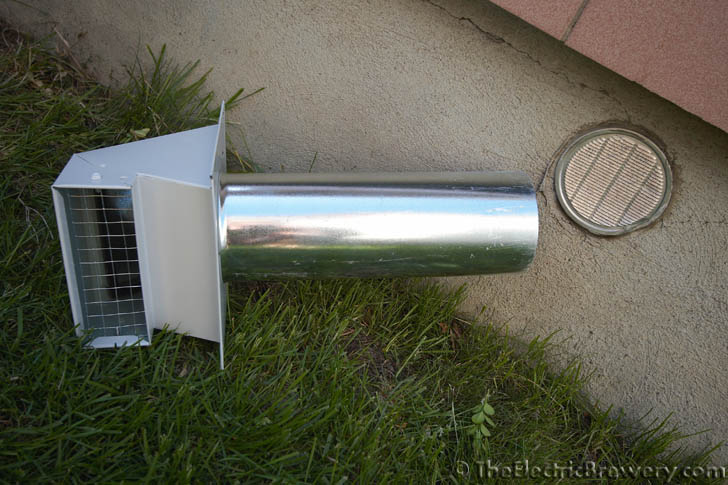
Both vents (nearly) installed and waiting to be sealed:
The fan brackets and metal strapping were used to mount the Vortex fan to the wall and ceiling. Duct work (including a 6" to 4" reducer in our case) was used to connect the fan to the 4" dryer exhaust vent shown above. Aluminum foil tape was used on all seals.
Vortex fan mounted:

Finished duct work (after the condensate hood was installed):

STEP 5: Mount the condensate hood
How you fasten the condensate hood to the ceiling of your brewery will depend on the material/composition of the ceiling in your brewery.
If your brewery ceiling uses standard joists made out of wood, you'll want to use lag bolts through the tile/drywall to fasten the panel directly to the studs for proper support. If the ceiling is concrete, use concrete sleeve anchors.
Our 12" high hood was installed flush with the ceiling as the room is only 7 feet high. This leaves approximately 15" between the tops of the kettles and the bottom of the hood. If your ceilings are considerably higher you may wish to use longer bolts to install the hood away from the ceiling and/or use a higher hood.
Again, every house and room will be slightly different so we can only give general guidelines and show what we did in our brewery.
Our condensate hood installed:
 We used concrete sleeve anchors to fasten our hood to the poured slab in the ceiling of our brewery.
These anchors are designed to allow them to anchor into concrete, brick and block. You insert them into a hole that is pre-drilled into concrete. The nut is then turned to pulls the working end of the sleeve anchor up through the sleeve, and it expands and anchors itself securely in the concrete, brick or block.
If you've never used concrete sleeve anchors before and need to fasten your hood like we did, take a look at the video below.

As the nut is tightened the sleeve is pushed up and expands, holding the bolt in place:
Concrete fasteners installed, the hood is raised in to place:
The nuts are removed, bolts passed through the hanging brackets, and then the nuts are tightened:

The drain has a 1/2" NPT male fitting. A brass 1/2" NPT female to 1/2" barb fitting with vinyl 1/2" ID hose drains into the sink. A hose clamp holds the vinyl hose to the barb fitting.
6" duct is connected between the hood output and the fan and sealed with aluminum foil tape. All done!


The condensate hood is now fastened securely and is strong enough to support many times its own weight (we tried hanging off it).
The next page includes some extra information on the testing we did before committing to having this custom hood built for us.
EXTRA INFORMATION: Testing
We were fairly confident that our 452CFM Vortex VTX600 exhaust fan was powerful enough for our needs, but before committing to having a custom condensate hood built for us we wanted to test the whole system. We had the following concerns:
- Are the fan and duct large enough to evacuate the moisture properly?
- Is the condensate hood size and shape adequate?
- Will condensation form on the flat ceiling of the hood and drip back down?
To perform our tests, we used two sheets of pink extruded polystyrene foam insulation to fabricate a prototype condensate hood. It was held together with foam insulation glue.
We then boiled 10 gallons of water for 2+ hours with the Vortex fan running full speed and watched for humidity/condensation/dripping throughout the system.
Temporary prototype condensate hood made out of pink foam insulation:


Our testing showed that our ventilation system worked as expected. There were no issues with excess moisture in the room (the fan was able to exhaust the steam adequately). There was no condensation or dripping from the ceiling of the hood at all, proving that we did not need a condensate hood with an advanced baffle system. In fact, it's questionable whether we even needed a gutter or trough on the inside but we chose to have one added anyway (just in case) as it did not add to the cost.
The prototype hood actually worked very well. Well enough that (other than the fact that it's very fragile) something similar could have possibly been used permanently. The fact that a brewery only exhausts non-grease heat and steam opens up other possibilities: A condensate hood of similar size and shape could have been built from other (possibly more resilient) materials such as cedar, plastic, etc.
Continue on to Building Your Brewery - Grain Mill.
