Hoses
- Introduction
- Parts and tools
- STEP 1: Cut the tubing
- STEP 2: Attach the quick disconnects
- STEP 3: Water hose (optional)
Introduction
We're going to need some hoses to connect together the various devices in our brewery such as the kettles, pumps, and the chiller (to name a few). We've been attaching male quick disconnects to various brewery parts, now it's time to build some hoses with female quick disconnects so that we can easily connect and disconnect hoses as needed.
Quick disconnects are (as the name would imply) connectors that can be connected and disconnected quickly. Ours seal very well (no drips at all) and support liquid flow in either direction. Female and male ends are used to form a locking seal. The male end is simply a post with a locking groove in it while the female end comes with a spring loaded cover (that must be pulled back when connecting/disconnecting), ball bearings that lock into the male groove, and a food grade o-ring that creates the seal.
Male and female stainless steel quick disconnects:
We use stainless steel disconnects in our brewery instead of plastic (polysulfone) or brass as stainless is easier to clean, stronger, and holds up better over the years to contact with acidic liquids such as beer.
The female ends (and not the male) are attached to the hoses because of the following advantages:
- Ergonomics: Easier to connect/disconnect quickly with one hand.
- Easier to clean: The female ends are more work to clean and it's easier to clean a disconnect on a hose than on a kettle.
- Cost savings: The female ends are more expensive and we have more male disconnects than female.
 To move hot water and wort around we use high temperature silicone food-grade tubing (1/2" ID, 7/8" OD) for our hoses. The silicone tubing we use is odourless, tasteless, inert, and FDA food-grade approved from -100F all the way up to 500F. The tubing is also translucent which lets us see the flow of liquid and air bubbles.
The use of less expensive poly vinyl chloride (PVC) tubing to transfer hot liquids is a highly debated topic amongst home brewers. While reinforced vinyl may technically 'work' in a brewing setup, we cannot recommend it for hot liquid transfers as most vinyl tubing is not food-grade approved nor is it rated for use up to the near boiling temperatures we will be using. In our experience off-flavours can also leech from the vinyl, especially when the tubing is new. This leeching increases at higher temperatures.
Thermoplastic tubing is also fairly popular for hot liquid transfer but it is completely opaque, making it harder to view the liquid inside. Thermoplastic is also rated to only about half the temperature of most silicone tubing and is not as inert.
If you're looking for the best grade tubing to use for brewing, use silicone. It's the number one choice in pharmaceutical, medical, food, and dairy (milking) use.
We're going to build five hoses: One 6 foot hose and four 4 foot hoses.
Finished 4 foot hose with female stainless steel quick disconnects attached:
This video shows the quick disconnects in use:
Parts and tools
The following parts are needed:
- (Qty: 10) Stainless steel female quick disconnect 1/2" NPT male
- (Qty: 10) Stainless steel 1/2" NPT female x 1/2" barb fitting
- (26 feet) High temperature food-grade silicone tubing (1/2" ID 3/4-7/8" OD)
- (Qty: 12) Stainless steel smooth-band worm-drive hose clamp (5/8" to 1-1/16" clamp diameter range)
- (Qty: 1) Stainless steel male quick disconnect 1/2" barb
- (Qty: 1) Brass 1/2" hose barb to female garden hose swivel coupling
- (Qty: 1) Faucet to garden hose adapter
You'll also need the following tools:
- Utility Knife
- Adjustable wrench
- Phillips #2 (crosshead) screwdriver
- PTFE white Teflon thread sealant tape
Some sellers do not ship outside the USA. If you live outside the USA (like us), we recommend using a forwarding service such as Shipito. We've used them to ship to Canada. The good news is that shipping within the USA is very inexpensive or often free. You then simply pay a small forwarded fee plus the cost of whatever shipping method you choose (USPS, FedEx, etc.). They will even consolidate multiple packages into one to save on shipping. We recommend USPS whenever possible to minimize brokerage fees.
Purchasing through our affiliate links helps support our site at no extra cost to you. We thank you!
STEP 1: Cut the tubing
The high temperature food-grade silicone tubing often comes in long pieces. We're making 5 hoses. Cut the long piece into the following lengths:
- Four 4 foot pieces
- One 6 foot piece
Try and cut clean and straight. Avoid any jagged edges. A razor blade based utility knife works best for this.
High temperature food-grade silicone tubing (1/2" ID, 7/8" OD):
STEP 2: Attach the quick disconnects
Wrap the threaded end of the female quick disconnect first with PTFE white Teflon thread sealant tape to ensure a tight, leak-free fit. Then attach the 1/2" barb x 1/2" NPT female fitting and tighten using wrenches, followed by the silicone tubing and hose clamp as shown in the pictures below.
Tighten the hose clamp using a screwdriver until it is very snug and firm (cannot be pulled off). While the special smooth-band hose clamp we use is specifically designed for silicone tubing, when tightening making sure not to overtighten and damage the hose.
We do not recommend using regular hose clamps for silicone hoses as the band can cut into the hose when tightening and over time as the hose is moved. The special smooth-band hose clamps we use have a smooth band with rolled edges ideal for use with silicone tubing.
Install on both ends of the hose. Repeat for all 5 hoses.
Breakdown of the hose parts:
(A) Stainless steel female quick disconnect 1/2" NPT male
(B) Stainless steel 1/2" barb x 1/2" NPT female fitting
(C) Stainless steel smooth-band worm-drive hose clamp (5/8" to 1-1/16" clamp diameter range)
(D) High temperature food-grade silicone tubing (1/2" ID 7/8" OD)

Both sets of disconnects attached:
 Note that the separate female quick disconnect with 1/2" NPT male fitting and 1/2" barb x 1/2" NPT female fitting that we used are also available as one single unit as a stainless steel female quick disconnect with 1/2" barb fitting.
We opted to use two pieces as adding the barbed fitting makes the solid ends of the hose a bit heavier (better when sparging into the boil kettle and filling fermenters) and a bit longer (easier to grip). Which option you choose is up to you.
Your hoses are now complete! After a brew day we simply rinse off the hoses and hang them to drip dry over our sink until next time. This stops water from pooling inside the hoses.
Hoses hanging to dry:
STEP 3: Water hose (optional)
This step is optional as there are many ways to initially fill the Hot Liquor Tank with cold water for brewing. If you use city water like us, you will find this water hose useful.
We use one of our existing four foot silicone hoses built as per the previous pages, attached to a special four foot water hose (shown below) to connect to our water faucet.
This water hose is simply a female garden hose swivel coupling on one end and a male quick disconnect with 1/2" barb on the other, connected by a piece of silicone tubing.
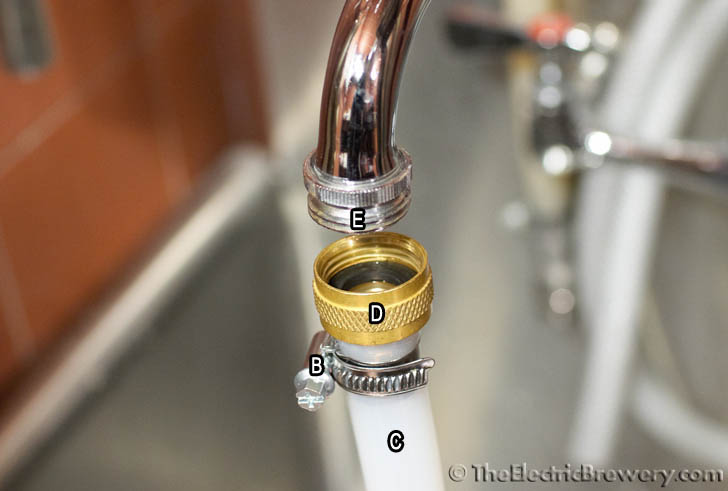
Breakdown of parts:
(A) Stainless steel male quick disconnect 1/2" barb
(B) Stainless steel smooth-band worm-drive hose clamp (5/8" to 1-1/16" clamp diameter range)
(C) High temperature food-grade silicone tubing (1/2" ID 7/8" OD)
(D) Brass 1/2" hose barb to female garden hose swivel coupling
(E) Faucet to garden hose adapter

Tighten the hose clamps using a screwdriver until they are very snug and firm (cannot be pulled off). While the special smooth-band hose clamp we use are specifically designed for silicone tubing, make sure not to overtighten and damage the hose.
We do not recommend using regular hose clamps for silicone tubing as the band can cut into the hose when tightening and over time as the hose is moved. The special smooth-band hose clamps we use have a smooth band with rolled edges ideal for use with silicone hoses.
To fill the Hot Liquor Tank, the water hose is attached to the garden hose adapter already on our sink faucet while the male quick disconnect attaches to any one of the other hoses already built. This then attaches to the water input valve at the top of the Hot Liquor Tank. Make sure to open the Hot Liquor Tank water input valve before turning on the water as silicone tubing is soft and may blow up like a balloon if the water pressure is high enough.
Food grade reinforced vinyl (PVC) tubing may also be used here if you like as the cold water temperature greatly reduces the possibilities of leeching any off flavours from the vinyl. We prefer to use silicone tubing for anything that comes in contact with our brewing water or wort.
Continue on to Building Your Brewery - Pumps.
