Wort Chiller
- Introduction
- Parts and tools
- STEP 1: Attach the 'wort in' quick disconnect
- STEP 2: Attach the 'wort out' quick disconnect and thermometer
- STEP 3: Attach the water hoses
Introduction
After the wort has been boiled it needs to be chilled to a yeast-friendly temperature.
We use a counterflow chiller (CFC) to perform this wort chilling in our brewery. A CFC is a heat exchanger built as a coil within a coil where two liquids (hot wort and cold water) flow in opposite directions resulting in cooled wort and heated water.
The outer tube in our chiller is made from 12 feet of 7/8" copper through which the cold tap water flows. The hot wort passes through the inner tube made of 5/8" convoluted (twisted) copper which continually turbulates the wort as it flows to maximize heat exchange. This results in a heat transfer that is so efficient that the exiting wort is never more than a degree or two above the temperature of the cold water, regardless of the speed at which the wort is pumped. Because of this convoluted or twisted inner tube, our CFC is more accurately called a convoluted counterflow chiller.
Other methods of chilling wort exist, including immersion chillers and plate chillers. An immersion chiller is a coil of metal (usually copper) through which cold water flows. The coil is immersed completely in the hot wort and the entire volume of wort is chilled at once. A plate chiller is simply a more compact version of a counterflow chiller where plates are used instead of coils. These different wort chillers have different advantages/disadvantages. Which you choose to use depends on many factors.
We chose not to use an immersion chiller due to the following disadvantages:
- Inability to use a hop back: A hop back (such as the Blichmann HopRocket) adds an extra punch of hop flavour and aroma that can't normally be achieved in the brew kettle alone. It is a small container that holds hops through which hot wort is passed immediately before it is cooled by the chiller, locking in the hop character. While mostly only used in certain beer styles (most notably American Pale Ales and IPAs) we want to keep our options open.
- Wort is not chilled as rapidly: Because the entire wort volume is chilled at once it chills more slowly. If chilled slowly the wort spends more time in the temperature zone where it is more susceptible to infection. Slow cooling can also lead to excessive dimethyl sulfides (DMS) causing a 'cooked corn' taste and aroma in the beer. Cold break may also not come out of solution which can result in a hazy beer (called 'chill haze') once it is refrigerated for serving. With a counterflow chiller, small portions of wort are chilled instantaneously from boiling to yeast pitching temperature as it passes through the chiller.
- Less efficient, higher water usage: It takes longer to chill the same volume of wort from start to end with most immersion chillers. Because of this, more water is used.
Blichmann makes a popular plate chiller called the Therminator, but after much research we chose not to use it (or any other plate chiller for that matter) as they are more work to clean due to the tiny passages and the fact that they cannot be disassembled. Brewers are recommended to backflush their plate chillers and some even recommend cooking them in the oven periodically to keep them clean/sanitized. While a plate chiller is more efficient and uses less water, we feel a convoluted counterflow chiller such as ours offers the best compromise: Fast chilling and a simplified clean-in-place (CIP) solution.
Counterflow chiller installed on our brew stand:
Close-up:
The counterflow chiller comes with either 1/2" NPT female or bare 5/8" diameter copper pipe for the wort in/out lines, and standard male/female garden hose connections for the cooling water. We will be attaching male quick disconnects for wort transfer, reinforced vinyl hoses for water transfer, and a thermometer to monitor final wort temperature. The whole assembly will then be mounted to the brew stand.
Parts and tools
The following parts are needed:
- (Qty: 1) RECOMMENDED: Convoluted counterflow chiller (5/8" diameter inner tube with 1/2" NPT female fittings already attached, male/female water hose connections)
- or -
(Qty: 1) Convoluted counterflow chiller (5/8" diameter bare inner tube, male/female water hose connections) and
(Qty: 2) Stainless steel 5/8" compression x 1/2" NPT female fitting and
(Qty: 6) Silicone high temperature o-ring (7/16" ID, 5/8" OD, 3/32" thick, AS568A Dash No. 111, Durometer hardness A70, FDA compliant, -65F to +450F) - (Qty: 2) Stainless steel male quick disconnect 1/2" NPT male
- (Qty: 1) Stainless steel tee 1/2" NPT female
- (Qty: 1) Stainless steel nipple threaded 1/2" x close NPT
- (Qty: 1) Stainless steel bi-metal thermometer 1/2" NPT male with 2-4" probe
- (Qty: 2) Brass 1/2" hose barb to female garden hose swivel coupling
- (Qty: 1) Brass 1/2" hose barb to male garden hose coupling
- (Qty: 1) Faucet to garden hose adapter
- (25 feet) Reinforced vinyl (PVC) tubing 1/2" ID
- (Qty: 3) Hose clamp (5/16" to 7/8" diameter hose)
- (Qty: 4) 1/2" to 3/4" pipe strap
- (Qty: 2) 2.5" deck screw
- or -
(Qty: 2) #8 x 5/8" metal screw
A source of water is required. We use a sink with faucet and rinse arm:
- (Qty: 1) Commercial grade stainless steel sink (24x24" bowl)
- (Qty: 1) Wall mount pre-rinse unit with faucet
You'll also need the following tools:
- Adjustable wrench
- Screwdrivers
- PTFE white Teflon thread sealant tape
- 1/8" high speed metal drill bill
Some sellers do not ship outside the USA. If you live outside the USA (like us), we recommend using a forwarding service such as Shipito. We've used them to ship to Canada. The good news is that shipping within the USA is very inexpensive or often free. You then simply pay a small forwarded fee plus the cost of whatever shipping method you choose (USPS, FedEx, etc.). They will even consolidate multiple packages into one to save on shipping. We recommend USPS whenever possible to minimize brokerage fees.
Purchasing through our affiliate links helps support our site at no extra cost to you. We thank you!
STEP 1: Attach the 'wort in' quick disconnect
If you are using the recommended convoluted counterflow chiller skip the first part of this step as 1/2" NPT female fittings are already attached. You will not need to add the compression fittings or o-rings. This modified version of the chiller did not exist when we built our original brewery.
We need some way to connect one of the standard male quick disconnects to the counterflow chiller so that we can attach the hoses we made. The problem now becomes; how do we connect a male quick disconnect with a 1/2" NPT male fitting to the bare 5/8" copper pipe found on the chiller?
Permanently soldering (sweating) on some sort of brass 1/2" NPT female fitting first would work, but in our solution we use a stainless steel compression fitting instead which doesn't require any soldering (for those that aren't comfortable using a propane torch and/or do not want to use brass in their setup).
We can't use this stainless steel compression fitting directly on the copper pipe as it would simply crush the copper while it was tightened. The ferrules (which form the tight seal as they are compressed) are stainless steel which is considerably harder than copper.
We have three options:
- Replace the ferrules with a softer nylon version (which will compress instead of the copper pipe).
- Use a rigid insert inside the copper pipe to avoid compressing it.
- Replace the larger compressing ferrule with a stack of 2-3 silicone high temperature o-rings.
We chose option #3 (o-rings) as we already had o-rings on hand that fit well: High temperature silicone o-rings (7/16" ID, 5/8" OD, 3/32" thick). These are the same o-rings used on Cornelius style beer keg quick disconnect posts, so we had a bag of 100 handy.
The inside of the stainless steel 5/8" compression to 1/2" NPT female fitting as received:
We replace the larger ferrule with three silicone high temperature o-rings. The smaller ferrule must be turned around to avoid cutting into the o-rings. When the two halves of the compression fitting are later screwed together the o-rings will slowly be compressed forming a tight seal between the copper pipe and the compression fitting.
Close-up of the ferrule and o-rings placed inside the compression fitting halves, showing the fit. The small ferrule has been turned around such that the flat end is facing upwards. This avoids cutting into the o-rings when the two halves are screwed together.
The following are placed on the bare end of the counterflow chiller copper pipe: The smaller end of the compression fitting, followed by the small ferrule (flat end facing up), and finally the three o-rings:
Wrap the threaded end of the male quick disconnect with PTFE white Teflon thread sealant tape and use a wrench to attach it to the top half of the compression fitting. Then screw the two assembled parts to the bottom half of the compression fitting. Tighten until finger tight and then use a wrench to tighten another full rotation to compress the o-rings. 

STEP 2: Attach the 'wort out' quick disconnect and thermometer
We're going to attach a male quick disconnect to the wort output side of the counterflow chiller along with a thermometer so that we can monitor the temperature of the cooled wort. We'll be able to adjust the wort temperature by adjusting the flow of the hot wort and cold water.
The stainless steel waterproof thermometer has a large easy to read 3" face and a 2-4" probe that will sit in the wort fluid flow to measure the temperature. This is a good quality bi-metal thermometer that provides fast response to temperature changes as flow adjustments are made. Some cheaper thermometers will often 'stick' requiring constant finger taps to obtain accurate readings.
Like in previous instructions, wrap all threaded ends first with PTFE white Teflon thread sealant tape to ensure a tight, leak-free fit.
If you are not using the recommended convoluted counterflow chiller then follow the previous instructions for the 'wort in' connection to place the smaller end of the compression fitting, small ferrule (flat end facing up), and the three o-rings on the bare end of the copper pipe.
As previously done, tighten the remaining parts to the larger half of the compression fitting and then screw the entire assembly to the smaller half. Tighten until finger tight and then use a wrench to tighten another full rotation to compress the o-rings. We now have a way of attaching ½” NPT fittings to the wort output and will attach the thermometer and male quick disconnect using a stainless steel tee.
Breakdown of parts:
(A) Stainless steel bi-metal thermometer 1/2" NPT male with 2-4" probe
(B) Stainless steel male quick disconnect 1/2" NPT male
(C) Stainless steel tee 1/2" NPT female
(D) Stainless steel nipple threaded 1/2" x close NPT
(E) Stainless steel 5/8" compression x 1/2" NPT female fitting (if required)

STEP 3: Attach the water hoses
As the hot wort circulates through the counterflow chiller inner coil, cold water flows through the outer coil extracting heat from the wort.
The cold water is supplied from the faucet of the large commercial sink (24x24" bowl) that sits next to our brew stand. The heated water simply goes down the drain. If you can, re-use the heated water for washing brewing equipment, laundry, watering the plants (after it cools down of course), or any other useful purpose.
Commercial stainless steel sink (24x24" bowl) with wall mount pre-rinse unit with faucet: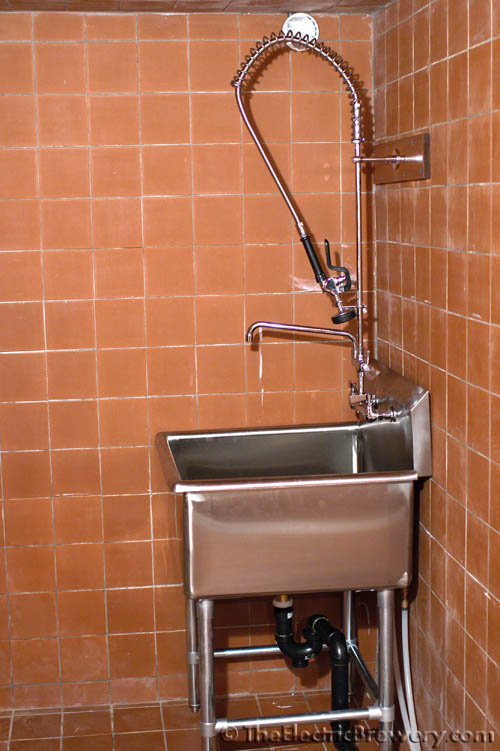
Cold water supply and drain hoses made of reinforced vinyl. Both water hoses simply hang out of the way in the sink when not in use. The cold water supply line is connected when needed for chilling. 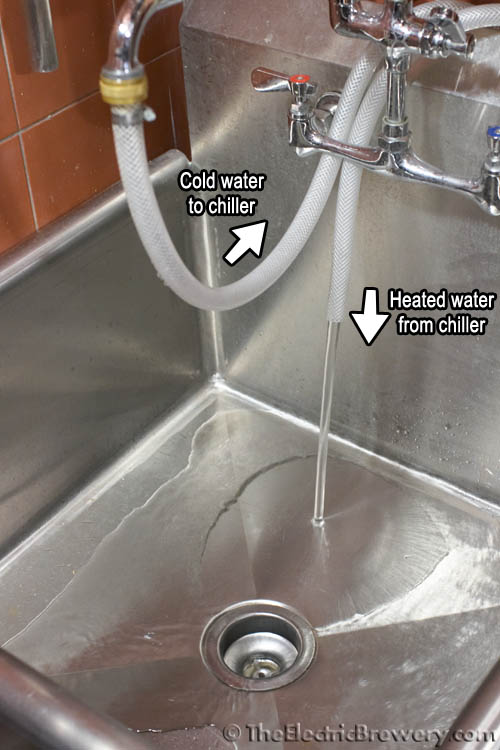
We use reinforced vinyl (PVC) tubing for the chiller water lines. There is no need to use more expensive silicone tubing as the wort never comes in contact with this hose. Silicone tubing cannot be used anyway as it cannot withstand typical household water pressure - it would blow up like a balloon. Reinforced vinyl tubing includes an embedded nylon braid which strengthens the tubing and also prevents it from kinking. It's rated to 150-180F which is high enough for our use.
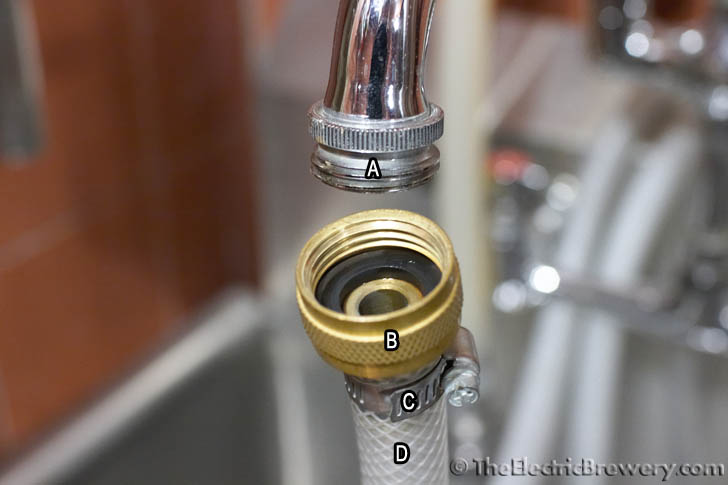
The counterflow chiller water in/out connections are standard garden hose fittings as most brewers brew outdoors. We'll be attaching fittings to our reinforced vinyl tubing so that we can attach them to the fittings on the counterflow chiller.
Use whatever length of reinforced vinyl tubing is required to reach your water supply and drain. It is typically sold by the foot. Measure and then purchase a few extra feet (just to be safe).
When connecting to the chiller, make sure the hot wort and cold water inputs are at opposite ends. We want the water and wort to flow in opposite directions to maximize heat transfer. Standard hose clamps are used as reinforced vinyl hose is much tougher than silicone. There's no need to use the special smooth-band worm-drive hose clamps we used with our silicone hoses.
Breakdown of parts:
(A) Faucet to garden hose adapter
(B) Brass 1/2" hose barb to female garden hose swivel coupling
(C) Hose clamp (5/16" to 7/8" diameter hose)
(D) Reinforced vinyl (PVC) tubing 1/2" ID
(E) Brass 1/2" hose barb to male garden hose coupling

Attach both hoses to the counterflow chiller and tighten to compress the rubber washers in the couplings. Run water through the chiller to test for leaks and tighten as needed. The water lines will stay connected at the chiller end at all times. There's no need to disconnect or drain the water between uses.
The counterflow chiller includes a mounting bracket with two holes. Use two 2.5" deck screws to attach the chiller to the 2x6" cross beam under the top shelf of your brew stand. If attaching to a stainless steel work table, most will have a similar reinforcing cross beam but we need to use metal screws instead: Drill two pilot holes using a 1/8” high speed metal drill bit and attach the chiller using two #8 x 5/8” metal screws.
You may want to use some pipe straps or brackets to keep the hoses out of the way under your brew stand.
Pipe straps keep the water hoses up and out of the way:
Done! You're one step closer to making beer.
Continue on to Building Your Brewery - Control Panel (Part 1).
